Backgammon Opening Moves
The best play for every opening roll, with diagrams
Last updated
Your very first move sets the tone of the game. Because the opening roll is always two different numbers, there are exactly fifteen opening rolls, and decades of computer analysis have settled on a best (or near-best) play for each. This page walks through them with board diagrams — the point-making rolls, the famous "lover's leap", and the standard split-and-build plays — plus a quick-reference table for all fifteen. New here? Read the how-to-play guide first, then practice free on BackgammonWorld.
Why the opening matters
To decide who starts, each player rolls one die; the higher number goes first and plays those two dice. That first move is your only "known" roll, so playing it well is free value. The strongest openings do one of three things: make a valuable point, run a back checker toward safety, or split and bring down a builder to make a point next turn. Nearly every recommended play below falls into one of those buckets.
How to read the notation
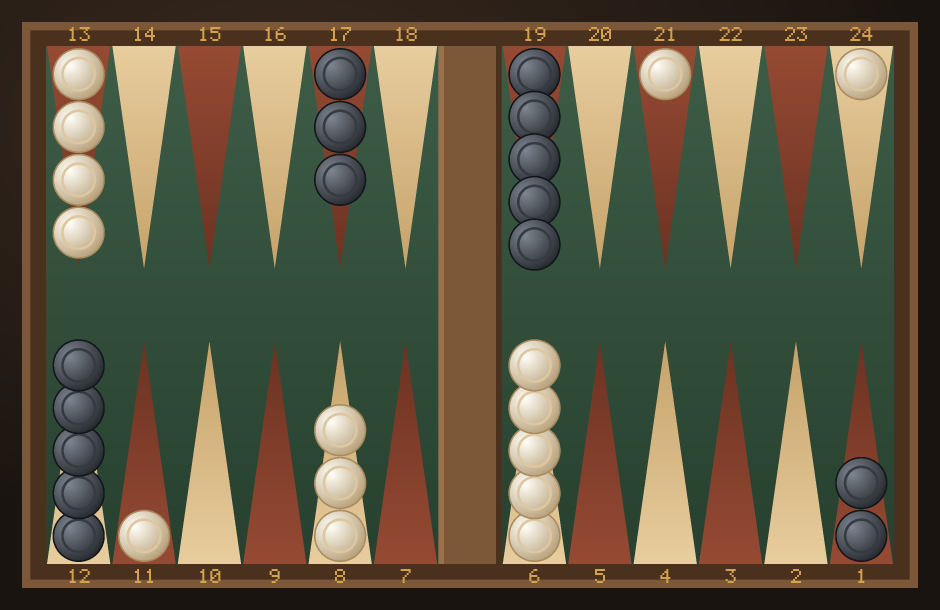
Moves are written as from/to. So 8/5 means "move a checker from your 8-point to your 5-point", and 24/13 means "move a checker from your 24-point all the way to your 13-point". Each player counts their own points from 1 (their last home point) to 24 (the far corner). In the diagrams below you play the ivory (white) checkers, moving from the high-numbered points down toward point 1.
The point-making rolls (the best)
Four opening rolls let you immediately make a valuable point. Making a point is almost always better than anything else on the first move — it builds safety and starts a blockade at the same time.
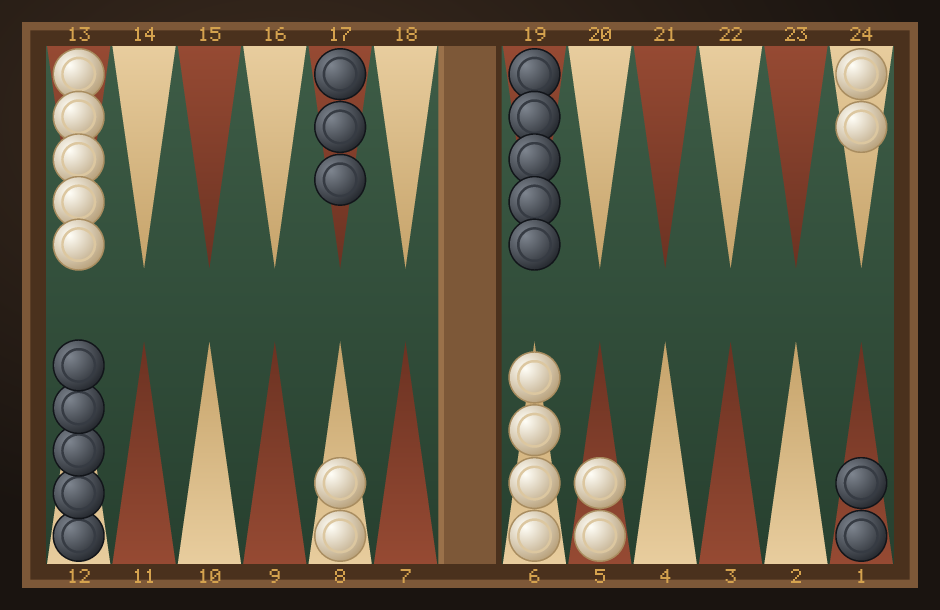
3-1 — make the 5-point (8/5, 6/5)
The best opening roll there is. The 5-point is the "golden point", and making it on move one is a dream start — a made point right where your opponent's back checkers want to escape.
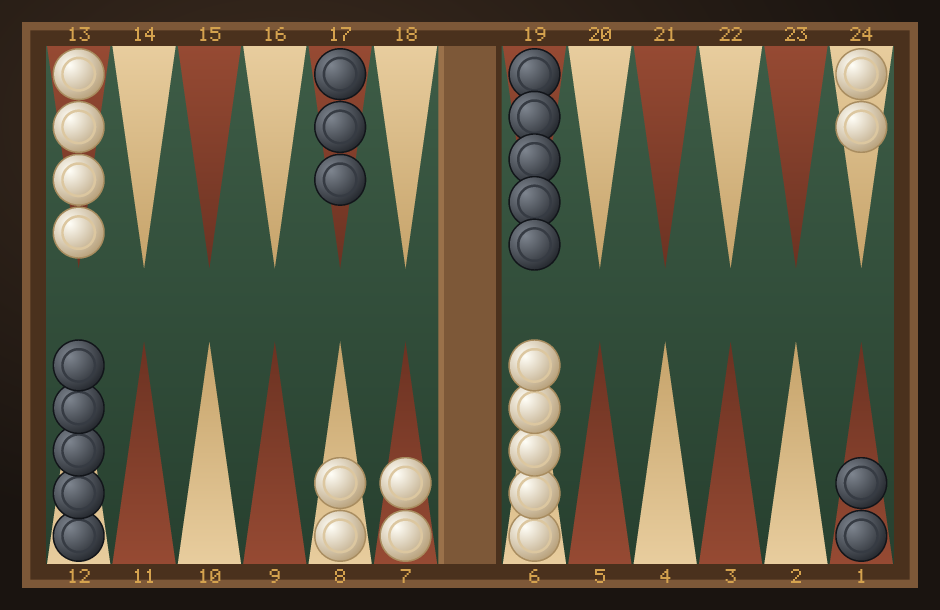
6-1 — make the bar point (13/7, 8/7)
The bar point (your 7-point) is the second most valuable point. Together with the 8- and 6-points it starts a wall right in front of your opponent's back checkers.
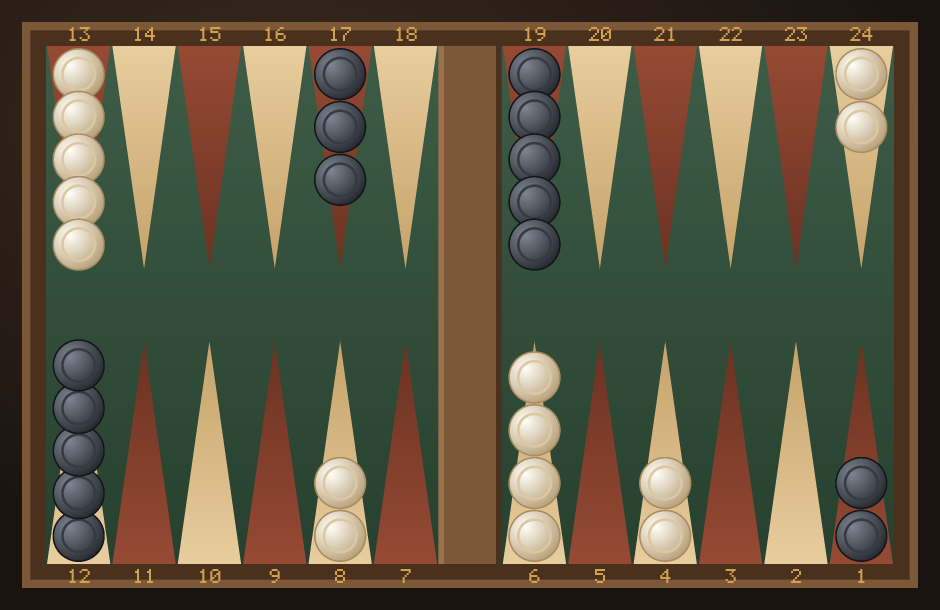
4-2 — make the 4-point (8/4, 6/4)
A clean, strong point in your home board. The 4-point is a key building block for both a blockade and a strong board if you later start attacking.
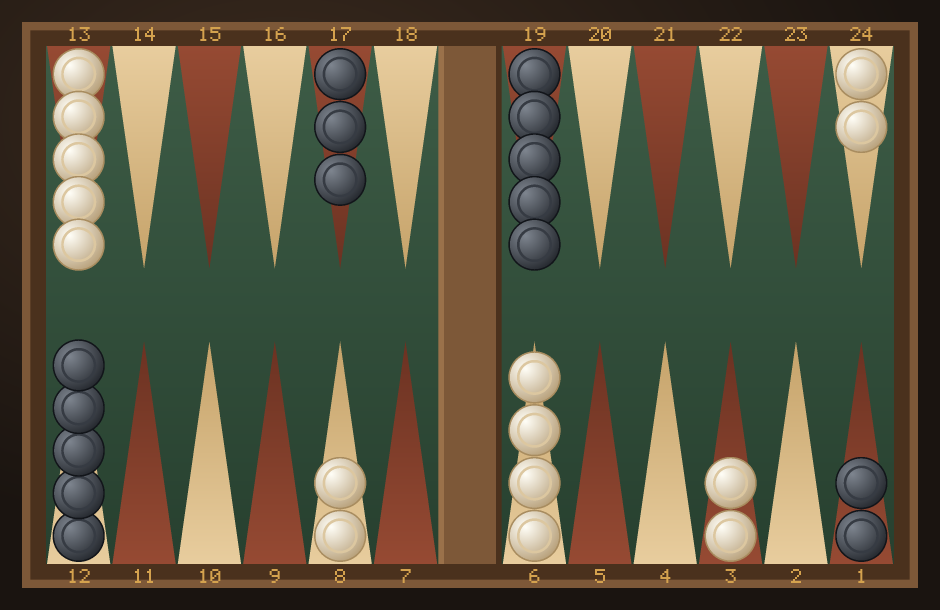
5-3 — make the 3-point (8/3, 6/3)
The 3-point is a little deep, but making a point is still the best use of 5-3. It gives you a solid home-board point to build on.
The running rolls: 6-5, 6-4 and 6-3
A six is the one number that can carry a back checker clear of your opponent's home board in a single stride. These three rolls all use it to run, trading a little exposure for a lot of progress.
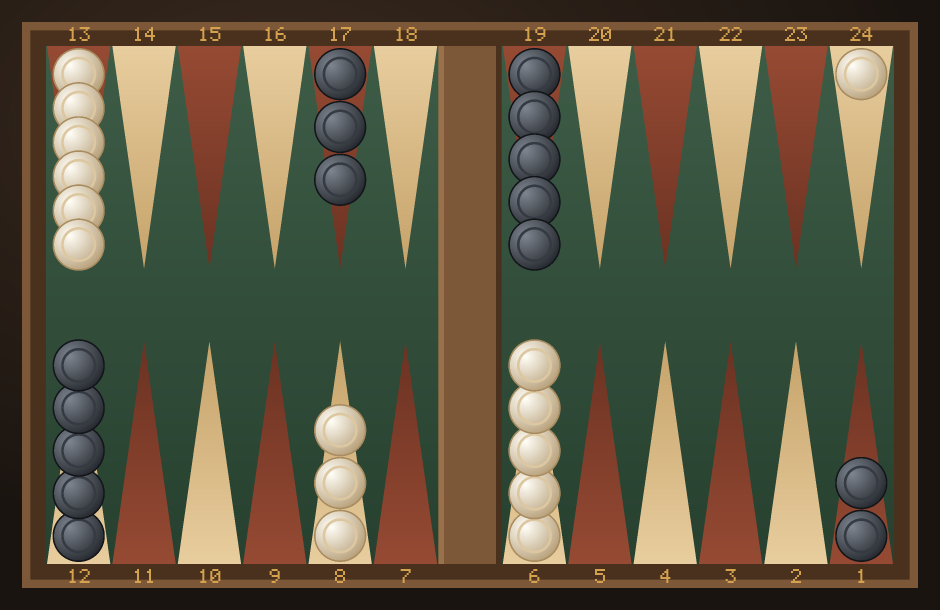
6-5 — the lover's leap (24/13)
The famous "lover's leap": with 6-5 you run a single back checker all the way from the 24-point to the safety of your 13-point (24/18/13). It escapes the back and lands on a point you already own — no risk, big progress. There is no serious alternative; every strong player plays this.
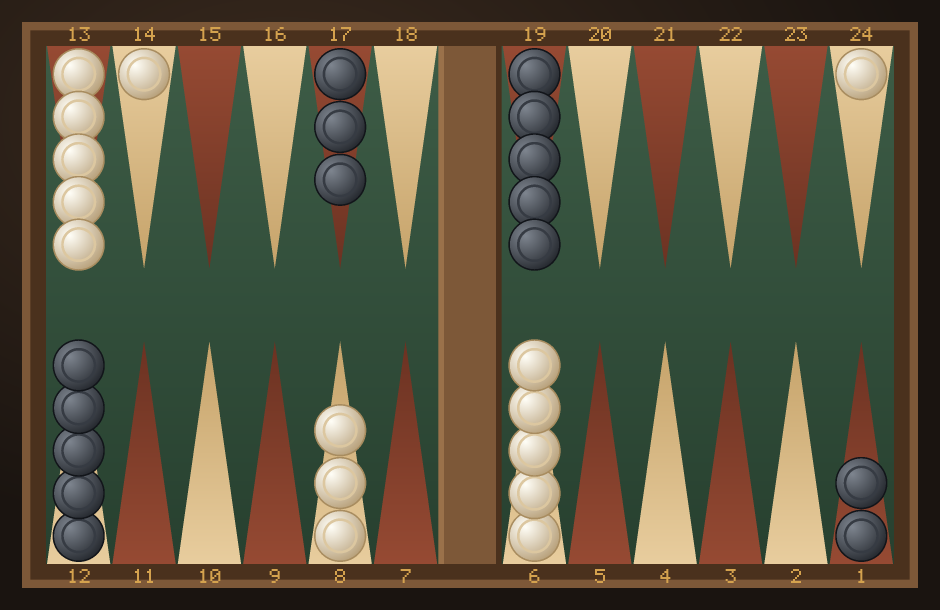
6-4 — run to the 14-point (24/14)
One pip short of the leap, so the runner stops on the empty 14-point as a blot instead of reaching safety. It is still the most popular play: the checker is past the worst of the opposition, and only a few numbers reach it. The main alternative is 24/18, 13/9, splitting to the 18-point and bringing a builder down instead of committing to the run.
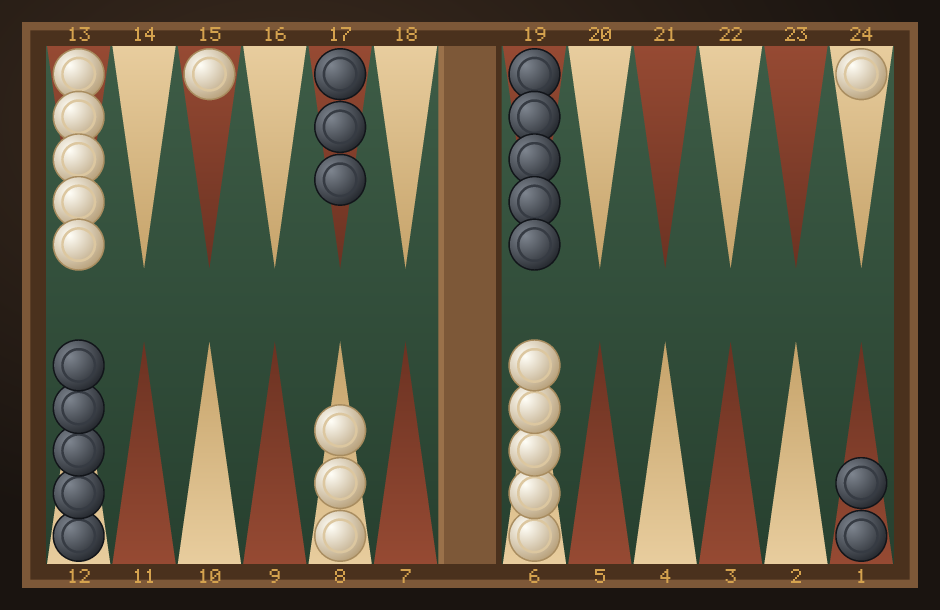
6-3 — run to the 15-point (24/15)
The same idea one pip shorter again. The checker on the 15-point is exposed, but it has escaped the crowded back and gives you a jumping-off square for next turn. Many players prefer 24/18, 13/10 here — splitting and building rather than running — and the two plays are close enough that either is defensible.
Splitting & building rolls
The remaining rolls cannot make a point straight away, so the standard plan is to split your back checkers — moving one off the 24-point to a more active square — and bring a builder down from the midpoint, setting up to make a point next turn. These plays do not look dramatic, but good building beats a flashy loose move nearly every time.
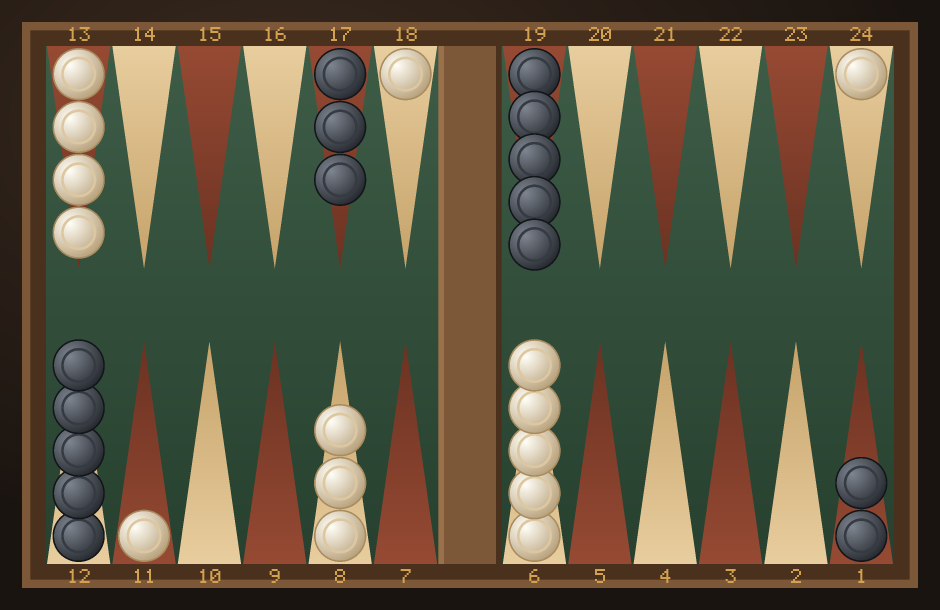
6-2 — split and build (24/18, 13/11)
The six splits a back checker to the 18-point, right in front of your opponent's outfield, and the two brings a builder down to the 11-point. Both checkers are exposed, but each is doing work: the one on 18 fights for an escape route, the one on 11 helps make a new point.
5-4 — reach for the golden anchor (24/20, 13/8)
The 20-point is the "golden anchor" — the most valuable point to hold in your opponent's home board, because it sits exactly where their builders want to land and gives your back checkers a safe base for the rest of the game. 5-4 puts a checker on it and plays the five safely onto your own 8-point.
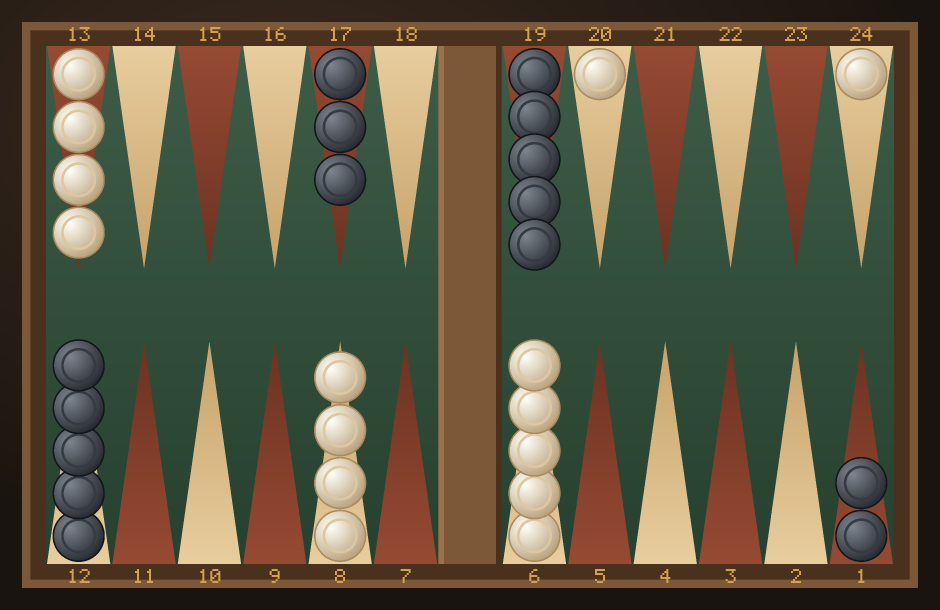
4-3 — split to 20, builder down (24/20, 13/10)
Also aiming at the golden anchor, this time with the builder landing on the 10-point, where it helps make the 5-point, the 4-point or the bar point next turn. A quiet roll that sets up a lot.
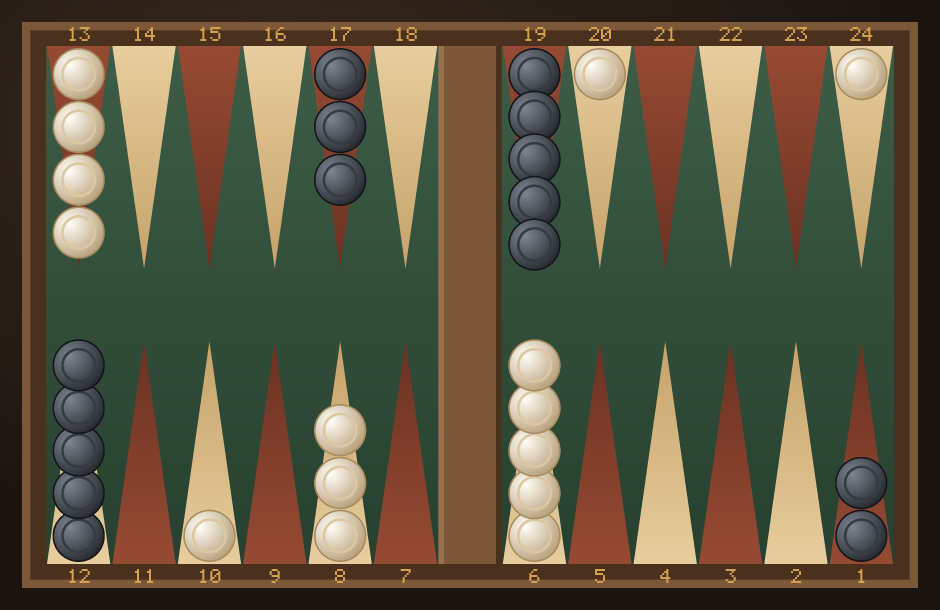
5-2 — build and split (24/22, 13/8)
5-2 has no point to make and no useful run, so the five brings a checker safely to your 8-point and the two nudges a back checker to the 22-point. The small split keeps your back checkers flexible without pushing one deep into trouble.
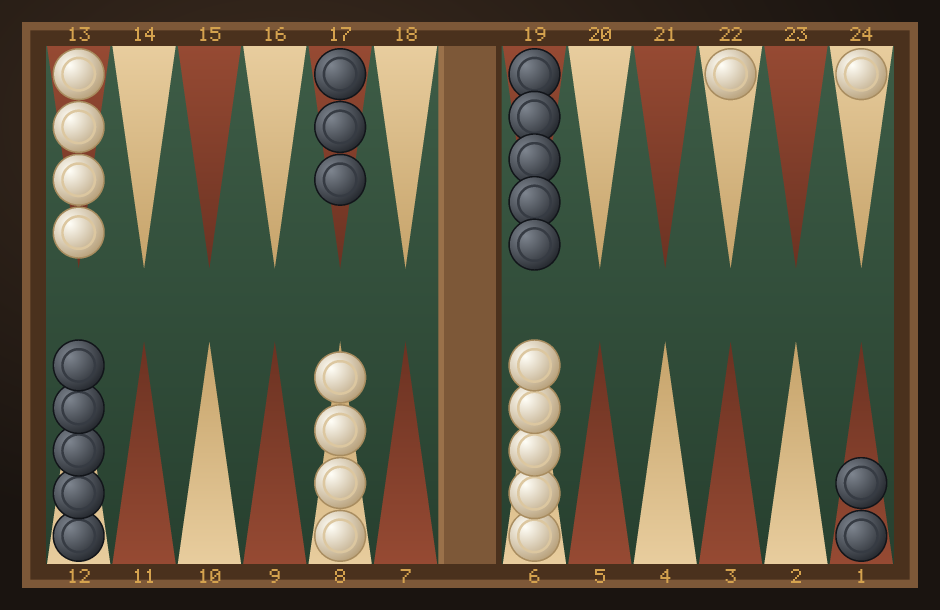
4-1 — split and build (24/23, 13/9)
The builder on the 9-point covers the 5-point and the bar point, and the one-pip split to 23 costs almost nothing while giving your back checkers a second square to work from.
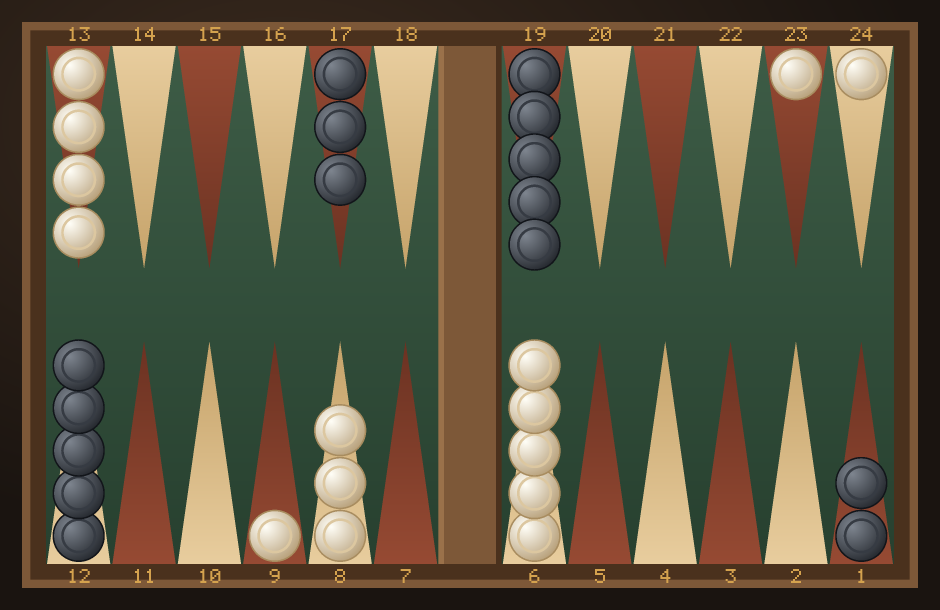
3-2 — split and build (24/21, 13/11)
Two reasonable plans. The one shown splits to the 21-point and brings a builder to 11. The alternative, 13/11, 13/10, plays both dice on the midpoint for two builders and no exposure at the back — the safer, more modern choice.
The slotting rolls: 5-1 and 2-1
These two rolls have the weakest "safe" plays, which is why an aggressive option becomes tempting: slotting. Slotting means dropping a single checker on the 5-point on purpose, hoping to cover it next turn. It wins games when it works and sends the checker back to the bar when it does not — a matter of style as much as of correctness.
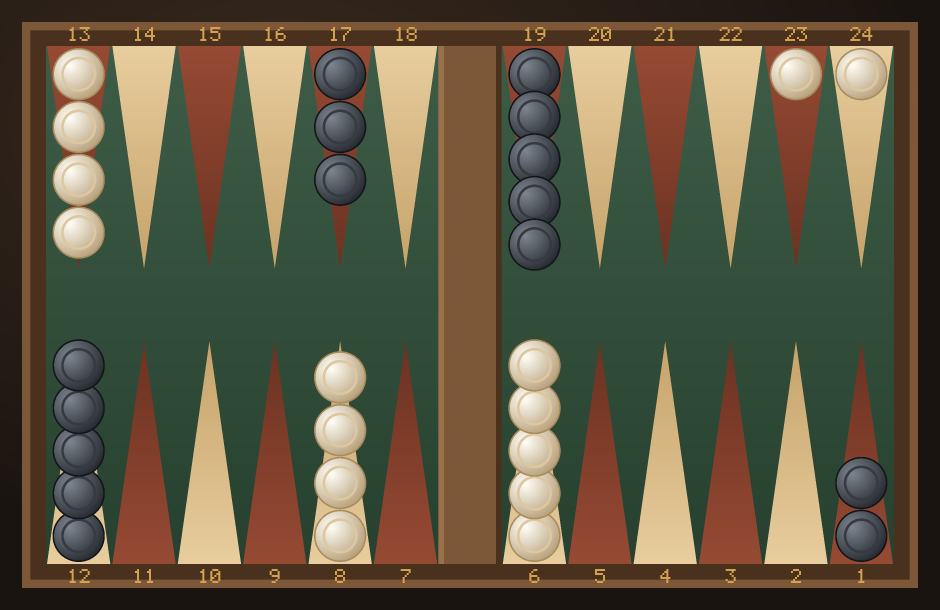
5-1 — build and split (13/8, 24/23), or slot with 6/5
The five brings a checker safely to the 8-point. The one either splits your back checkers to the 23-point, as shown, or slots the golden 5-point with 6/5. Both are played at every level.
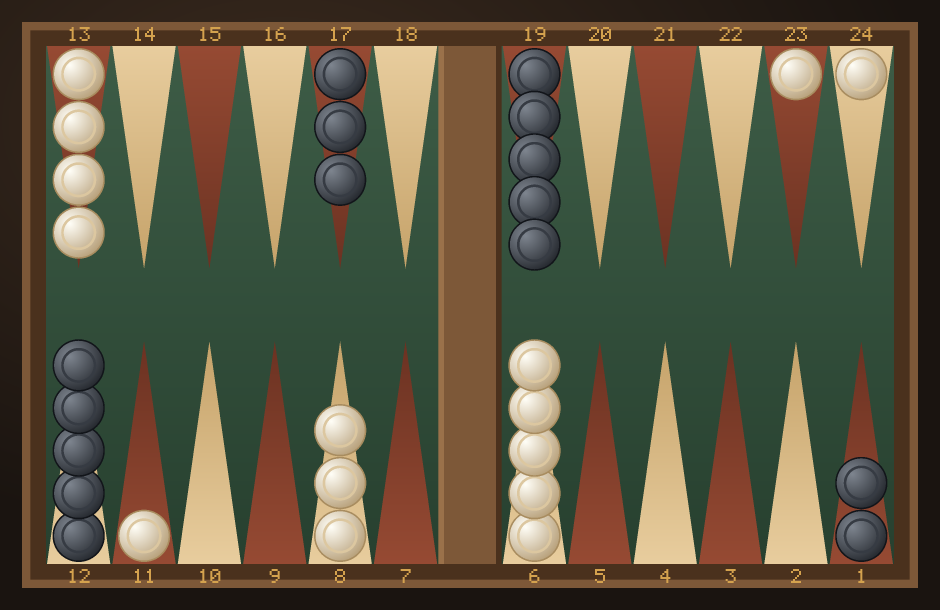
2-1 — build and split (13/11, 24/23), or slot with 6/5
The smallest opening roll and the one with the least to do. The standard play brings a builder to the 11-point and splits one pip; the aggressive alternative is again the 5-point slot (13/11, 6/5). Neither gains much — 2-1 is simply a weak roll.
All 15 openings at a glance
A quick reference for every opening roll. A few rolls have more than one strong choice, shown as an alternative.
| Roll | Recommended play | The idea |
|---|---|---|
| 3-1 | 8/5, 6/5 | Make the 5-point — the best opening roll. |
| 6-1 | 13/7, 8/7 | Make the bar point (7-point). |
| 4-2 | 8/4, 6/4 | Make the 4-point. |
| 5-3 | 8/3, 6/3 | Make the 3-point. |
| 6-5 | 24/13 | The "lover's leap" — run a back checker to safety. |
| 6-4 | 24/14 (or 24/18, 13/9) | Run a back checker, or split and build. |
| 6-3 | 24/15 (or 24/18, 13/10) | Run, or split and bring down a builder. |
| 6-2 | 24/18, 13/11 | Split your back checkers and unstack the midpoint. |
| 5-4 | 24/20, 13/8 | Reach for the golden anchor and build. |
| 5-2 | 24/22, 13/8 | Split and bring down a builder. |
| 5-1 | 13/8, 24/23 (or 13/8, 6/5) | Build, and split (or slot the 5-point). |
| 4-3 | 24/20, 13/10 | Split to the golden anchor and build. |
| 4-1 | 24/23, 13/9 | Split and bring down a builder. |
| 3-2 | 24/21, 13/11 (or 13/11, 13/10) | Split and build, or double-build. |
| 2-1 | 13/11, 24/23 (or 13/11, 6/5) | Split and build, or slot the 5-point. |
What about doubles?
There are no opening doubles. Since the opening is decided by each player casting a single die, a tie is simply re-rolled — so your first move is always two different numbers. Doubles only appear from the second turn onward, where you play the number four times.
The numbers behind the fifteen plays
Every guide on the web repeats the same fifteen plays, and almost none of them shows what the plays are actually worth. Below is the full table: the best play for each opening roll, what the position is worth after it, how often it wins, how often it wins a gammon, and — the column most guides leave out — how far ahead of the second-best play it is.
Where these numbers come from. They are equities from wildbg, a neural-network backgammon engine that plays at tournament strength, queried once for every legal opening play. We publish them rather than our own because of something worth knowing about self-play measurements in general — see below. Every play in the table was checked against our own rules engine: each one is legal, and each leads to a position our engine also reaches.
| Roll | Best play | Equity | Wins | Gammons | Ahead by |
|---|---|---|---|---|---|
| 3-1 | 8/5 6/5 | +0.089 | 53.2% | 15.7% | 0.139 |
| 4-2 | 8/4 6/4 | +0.058 | 51.9% | 15.4% | 0.097 |
| 6-1 | 13/7 8/7 | +0.036 | 51.5% | 14.3% | 0.105 |
| 6-5 | 24/18 18/13 | +0.011 | 51.3% | 10.9% | 0.036 |
| 5-3 | 8/3 6/3 | +0.002 | 50.0% | 14.5% | 0.024 |
| 5-4 | 24/20 13/8 | -0.024 | 49.3% | 12.2% | 0.012 (tie) |
| 4-3 | 24/21 13/9 | -0.025 | 49.1% | 13.1% | 0.019 (tie) |
| 6-4 | 24/20 20/14 | -0.033 | 49.6% | 11.2% | 0.014 (tie) |
| 3-2 | 24/21 13/11 | -0.035 | 48.8% | 12.5% | 0.008 (tie) |
| 6-3 | 24/21 21/15 | -0.036 | 49.5% | 11.1% | 0.010 (tie) |
| 4-1 | 24/23 13/9 | -0.040 | 48.6% | 13.3% | 0.031 |
| 5-2 | 24/22 13/8 | -0.041 | 48.6% | 12.2% | 0.023 |
| 6-2 | 24/18 13/11 | -0.046 | 49.1% | 11.7% | 0.007 (tie) |
| 5-1 | 24/23 13/8 | -0.047 | 48.3% | 12.3% | 0.030 |
| 2-1 | 24/23 13/11 | -0.047 | 48.5% | 12.6% | 0.023 |
Equity is what the position is worth in points, counting gammons: a plain win is +1, a gammon +2, a backgammon +3, and the same negative for the losses. Zero means the two sides are level. The opener is only slightly ahead even after the best roll, which is the first thing the table teaches — 3-1 is worth +0.089, not half a game.
What the table shows
- The point-making rolls lead, in the order theory has always given. 3-1, 4-2, 6-1, 6-5, 5-3 — 3-1 makes the 5-point, 4-2 the 4-point, 6-1 the bar point. Only then comes 6-5, the roll that runs a back checker clean to safety, and after it 5-3 for the 3-point.
- 3-1 is not just first, it is first by a distance. It is 1.4× further ahead of its own runner-up than 4-2 is of hers. The 5-point really is different from the point one step below it.
- Six of the fifteen rolls have no real favourite. 5-4, 4-3, 6-4, 3-2, 6-3, 6-2 — in each of these the best and second-best play sit less than 0.02 apart, which is nothing. That is not a gap in the data; it is why the sources disagree. When two plays are this close, style and match score decide, and any guide that states one of them as the answer is overstating what is known.
- Nothing about the opening is decisive. The gap between the best roll and the worst — 3-1 at +0.089 against 2-1 at -0.047 — is about 0.14 points. Games are not won on the first move; they are lost on the twentieth.
What we measured ourselves, and where it stopped
Before the table above existed, this page carried our own measurement: 1,500 games for every candidate play, our engine on both sides, and every candidate playing the same 1,500 games — same seed, identical dice from move two onward, only the first play different. That pairing matters, because without it the difference between a good opening and a mediocre one disappears into noise.
For the question which play is best, it worked: the measurement agreed with the recommendation ten times out of ten, and that result stands. For the question how much the roll is worth, it did not — and the way it failed is worth more than the numbers were.
Our engine reported that the opener wins 63.5% of games after 6-5. The true figure is about 51%. Play the same position out with a tournament-strength engine on both sides and it lands on 51.2%, within a tenth of a point of its own evaluation of the position; play it with ours and it lands on 65.5%. After 3-1 the two agree almost exactly (56.3% against 55.5%).
The reason is specific and instructive. The lover's leap runs a back checker home and steers the game toward a race; making the 5-point steers it toward a positional fight. Our engine can convert a racing advantage and cannot convert a positional one — so it was not measuring how good the play is, but how well it plays the kind of game that follows. On the strength of that number this page briefly claimed that 6-5 is worth more than 3-1, against every published rollout. It is not, and the claim is gone.
The general lesson, since it applies to every self-play number anywhere: a measurement
made by an engine playing itself can never be better than that engine. It can compare two plays
fairly, because both sides share the same blind spots — that is why the ten-out-of-ten agreement
holds. It cannot tell you what a position is worth, because the answer is entangled with how well
the measurer handles it. Re-run either one yourself: node tools/opening-stats.js for
the paired self-play, node tools/wildbg-openings.js for the table above.
Opening principles
- Make a point when you can. The four point-making rolls (3-1, 6-1, 4-2, 5-3) are automatic — take the point.
- Prize the 5-point and bar point. They block your opponent's escape better than any other points.
- Bring builders down. Spare checkers from the 13-point set up next turn's point.
- Split to make an anchor. Moving a back checker to the 20- or 18-point fights for a safe, active anchor.
- Don't over-think it. The plays above are well established — learn them, then focus your energy on the middle game.
The second move: replying to the opening
Learning the fifteen opening plays only gets you through turn one. The reply — your first move after your opponent has already played — is a different problem, and a bigger one: there are fifteen openings times twenty-one replies, so nobody memorises it. What you need instead are the three questions that decide almost every reply.
1. Did they make a point, or leave a blot?
If the opener made a point (3-1, 6-1, 4-2, 5-3), there is nothing to hit and you play your own best structural move — usually the same play you would have made as the opener, adjusted for the point they now hold. If they split or slotted, there is a checker to consider hitting, and hitting usually beats building. A hit gains about 25 pips and costs them a turn.
2. Can you hit and cover, or hit and make a point?
Hitting while doing something else is the strongest kind of reply. After an opening 2-1 slot to the 5-point, a reply that hits and makes that same 5-point is close to a winning position out of the gate — it takes the best point on the board and sends a checker 20 pips back at once. Look for these before anything else.
3. Does the opening change what your own roll is worth?
This is the part that catches people out. A 6-5 is a clean run to safety when the coast is clear — but if your opponent has just made their bar point, the same 6-5 runs one checker straight past a blockade and leaves the other alone at the back. The play does not change because your roll changed; it changes because the board did.
Questions about the opening
What is the best opening roll in backgammon?
3-1, without much argument. It makes the 5-point — the golden point — immediately, which is the single most valuable thing that can happen on the first move. After it, most players rank 6-1 (the bar point), 4-2, 6-5 and 5-3 as the next strongest.
What is the worst opening roll?
2-1. It makes nothing, runs nowhere, and every reasonable play with it is a small one. 4-1 and 5-1 are barely better. The good news is that a weak opening costs very little — the game is decided over the next twenty moves, not this one.
Can you roll doubles on the opening move?
No. The first move is decided by each player casting a single die, and a tie is re-rolled, so the opening is always two different numbers. That is exactly why there are fifteen opening rolls and not twenty-one.
What does "slotting" mean?
Deliberately leaving a single checker on a valuable point — nearly always the 5-point — hoping to cover it with a second checker next turn. If your opponent hits it, the checker goes back to the bar and starts over. It is the classic risk-for-reward play, mostly seen with 5-1 and 2-1.
Do I have to play the recommended move?
No — these are the plays that decades of computer rollouts favour, usually by a small margin. Several rolls have a second play that is nearly as good, and match score changes the picture too: when you are far behind in a match you may want the riskier line, and when you are far ahead the quieter one.
Why is the 5-point worth more than the 4-point?
Because it does three jobs at once. It is a home-board point, so it helps close the door on anyone you hit; it is the middle of any prime you go on to build; and it is the point an escaping back checker most wants to land on. The 4-point is a useful point, but it is one step further from the blockade that matters. That is why 3-1 — the roll that makes the 5-point — is considered the best first roll in the game, ahead of 4-2, which makes the 4-point the same way.
Should I split my back checkers or stay put?
Split when the roll gives you nothing better, and especially when it reaches for an anchor: 5-4 and 4-3 both put a checker on the 20-point, the best defensive point on the board. Stay put when your opponent has a strong home board, because a split checker that gets hit re-enters into trouble. Early in the game, when nobody's board is threatening, splitting costs little and gains a lot.
What is a builder?
A spare checker positioned so it can help make a point next turn. Most opening plays that do not make a point bring one or two builders down from the 13-point, because a checker on the 9- or 11-point can combine with others to make the 5-point, the 4-point or the bar point on the following roll. Builders are why "13/9" appears in so many of the plays above.
Is it ever right to leave a blot on the first move?
Yes, and two of the fifteen rolls do it deliberately. Slotting the 5-point with 2-1 or 5-1 puts a lone checker on the most valuable point on the board, betting that you will cover it next turn before it is hit. It is hit by 11 of the 36 rolls, so it is a real risk taken for a real prize. Modern rollouts slightly prefer the safer split with both rolls, but the slot remains playable and is a matter of style as much as of equity.
Does the opening roll decide the game?
No. The advantage from the best opening roll is real but small — worth a few percentage points of win rate, not a won game. What the opening does is set up the position you will be playing for the next ten moves, which is why the plays are worth knowing: they cost nothing to learn and they stop you starting from behind.
What should I do after the opening?
Follow the plan the opening set up. If you made a point, keep making points and build toward a prime. If you split, look to anchor or to hit. And from move two onward the decisions come from position rather than from a table — the strategy guide covers the four game plans and when each applies, with measurements of what each one is worth.
Where do these recommended plays come from?
From decades of computer rollouts by strong engines, which have been remarkably stable since the 1990s — the openings are the most settled part of backgammon theory. We have measured them in our own engine as well; the table above shows where that agrees and, honestly, where it does not.
Practice the openings
The fastest way to learn is to play them out. On BackgammonWorld the board highlights your legal moves, so you can try each opening and see how the game develops — against the computer on three levels, or against friends and online opponents, all free with no signup.
▶ Play backgammon nowGo deeper: our full backgammon strategy guide (game plans, priming, anchors) and the how-to-play guide (rules, setup, bearing off).
← Back to the game