Backgammon Strategy
A practical guide to winning more games
Last updated
Backgammon rewards a plan. The dice decide a lot, but over many games the player who chooses the right strategy — knowing when to race, when to block, when to hit, and when to sit tight — wins far more often. This guide covers the ideas that separate strong players from beginners, and it does one thing the other strategy guides do not: it puts numbers on them. We played 3,000 games between two equally strong engines and recorded which side achieved each idea first and who went on to win. Some of the results confirm the received wisdom. One of them contradicts it. New to the game? Start with the how-to-play guide first, then come back here — and practice everything free on BackgammonWorld.
First: are you ahead or behind?
Almost every backgammon decision starts with one question: who is winning the race? Your pip count answers it — the total distance your checkers still have to travel. As a rough rule:
- Clearly ahead (roughly 8–10%+): simplify and race home. Avoid unnecessary contact; you don't need to fight when you're already winning the sprint.
- Roughly even: fight for the key points, keep flexible, and take good hits.
- Clearly behind: don't race — you'll lose. Hold an anchor and play for a hit or a prime, so a single shot can swing the game back.
What each idea is actually worth
Every strategy guide tells you to make the 5-point, build a prime and hold an anchor. None of them says how much any of it is worth. We can, because we ship the engine that plays the games: two copies of it, at identical strength, played 3,000 complete games. For each game we recorded which side reached each milestone first, and who eventually won.
| The side that… | …went on to win | Games |
|---|---|---|
| built a six-prime (and the opponent did not) | 74.1% | 995 |
| hit more checkers than the opponent | 71.9% | 2,481 |
| built a four-prime | 68.7% | 1,084 |
| built a five-prime | 68.2% | 1,647 |
| made its own 5-point first | 58.4% | 2,925 |
| anchored on the opponent's 5-point first | 52.0% | 757 |
| was the only side still holding a back anchor | 29.9% | 3,000 |
Three things follow, and the third is the one worth the whole table.
- Blocking beats everything else you can build. A six-prime is the strongest single thing that happens in these games — stronger than winning the hitting battle. Note that four and five come out level: the jump that matters is the sixth point, which is the one that takes the escape from "unlikely" to "impossible".
- The 5-point earns its reputation, but it is not the game. Making it first is worth about eight points of win rate — real, and rather smaller than the way it is usually described.
- The anchor line looks terrible, and it is the most useful line in the table. The side left holding the only back anchor wins 29.9%, and even the golden 20-point anchor only reaches 52%. That is not an argument against anchoring; it is the clearest selection effect here, and understanding it will change how you read your own games. You still have a back anchor because you are behind — the side that is ahead has long since run those checkers home. The anchor is a symptom of a losing race, not a cause of it. A good anchor drags a bad position back toward even, which is exactly what it is for. Read the line as "positions that still need an anchor are bad positions", never as "do not anchor".
What these numbers are, precisely. They are correlations measured inside our own
engine, not rollout equities. The side that makes the 5-point first is often simply the side that
rolled better, so part of every figure above belongs to the dice. Both seats play at identical
strength, so nothing here is contaminated by one side being better. Re-run them yourself with
node tools/strategy-stats.js.
The four game plans
Most positions call for one of four broad plans. Recognising which one you are in — and committing to it — is the single biggest strategic skill.
- 1. The race. You are ahead in pips. Run your back checkers to safety, avoid blots, and bring everyone home as efficiently as possible. Fewest wasted pips wins.
- 2. The priming (blocking) game. Build a wall of made points in front of your opponent's back checkers so they can't escape, then bring your position home while they sit trapped. Great when you have trapped a checker or two.
- 3. The blitz (attacking game). Hit an opponent's blot, then keep attacking — making home-board points while they're stuck on the bar — aiming to close them out completely. Best when your opponent is loose and your home board is strong.
- 4. The holding / back game. You are behind. You hold an anchor in the opponent's home board and wait for them to leave a shot as they bear in. One good hit late in the game can turn a loss into a win.
These aren't rigid boxes — games shift from one to another — but at any moment you should know which plan you're playing and let it guide each roll.
Make the right points
Making points (two or more checkers together) builds both safety and blockade. Not all points are equal — prioritise these:
- Your 5-point ("the golden point"). The single most valuable point on the board. It blocks escape and anchors your prime. Grab it early whenever you can.
- Your bar point (7-point). Next in value — together with the 5- and 6-points it forms the core of a blockade.
- Your 4-point, then the rest of the home board, especially when you're attacking.
- The 20-point ("golden anchor") in your opponent's home board — the best defensive point to hold when you're on the back foot.
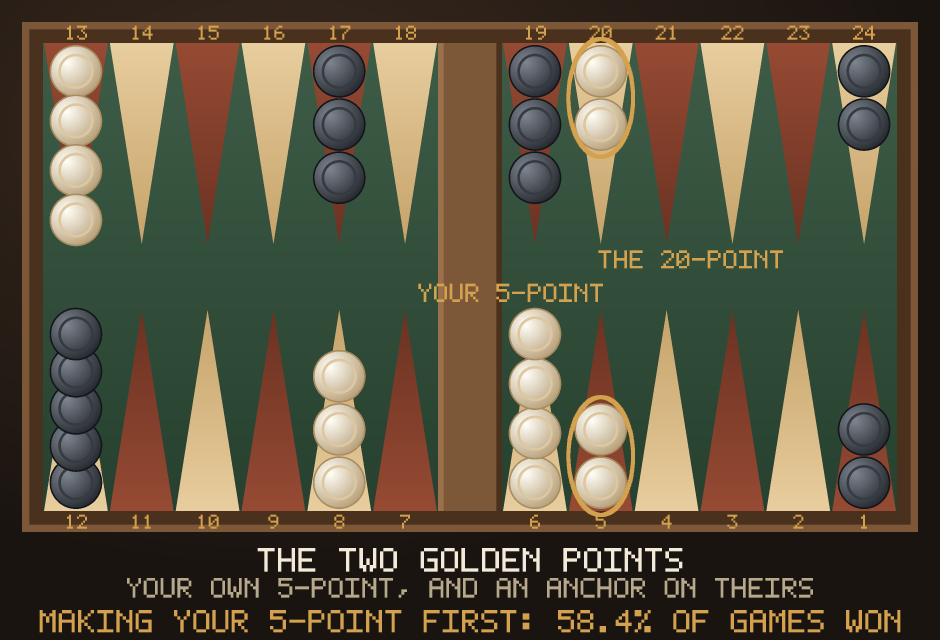
Why the 5-point and not another? Because it does three jobs at once. It is part of your home board, so it helps close the door on a checker you hit. It is part of any prime you go on to build, and it is the point an escaping back checker most wants to land on. A point that is simultaneously defensive, structural and denied to the opponent is worth more than one that only does one of those things — which is exactly why the 3-1 opening that makes it is considered the best first roll in the game. Our opening moves guide has the best play for all fifteen rolls.
A useful habit: keep builders — spare checkers on your 8- and 13-points — ready to make new points. Don't bury everything on the 6-point where it can't help. Three checkers stacked on the 6-point are not three assets; they are one point and two checkers doing nothing. Spares belong where they can reach the points you still want.
The mirror of all this is the 20-point, your anchor inside the opponent's home board. It is the same point seen from the other side, and it is the safest place to keep two back checkers: from there they cannot be attacked, they hold a shot at anything that comes past, and you always have somewhere to re-enter after being hit.
When to hit (and when not to)
Hitting a blot sends it back ~25 pips and forces your opponent to re-enter before doing anything else. It's powerful, but not always right. Hit when:
How likely you are to hit — or to be hit back — is not a feeling: a blot six points away is hit by 17 of the 36 rolls, one eleven points away by 2. The complete table is on the backgammon odds page.
- It gains you the race, or makes a key point while hitting (a "point-on-the-head" — the strongest play in the game).
- Your home board is strong, so a checker on the bar struggles to come back in.
- You're behind and need to create contact and chances.
Think twice about hitting when:
- Your own home board is weak — the checker re-enters easily and you've just exposed a blot.
- You're comfortably ahead in the race; a wild hitting battle only gives the trailer chances.
- The hit leaves you with a worse blot than the one you removed.
Building and using a prime
A prime is a row of consecutive made points. A checker stuck behind a full six-point prime cannot escape with any roll — it is completely trapped until you're forced to open a gap.
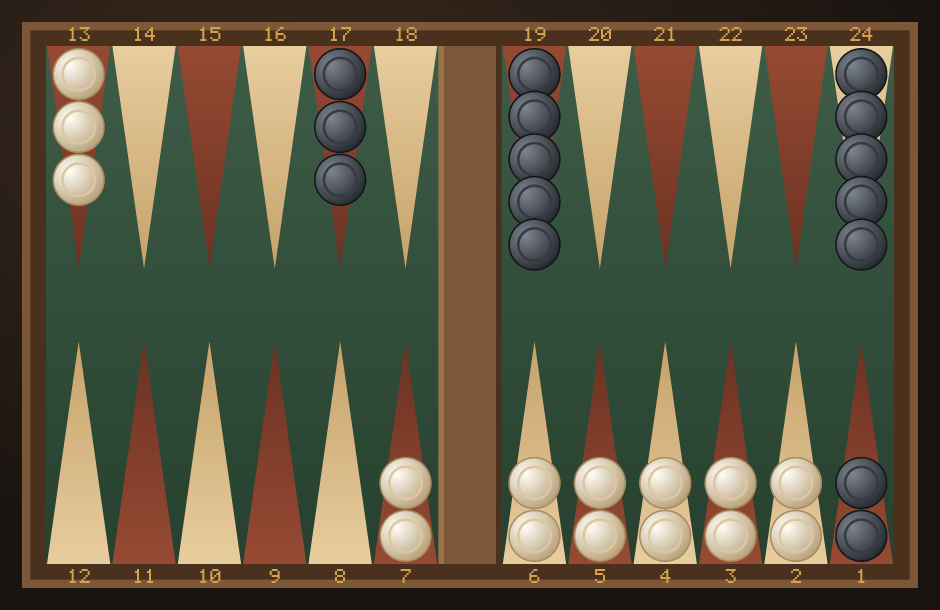
The difference between wall lengths is not gradual — it is a cliff, and it can be counted exactly rather than estimated. We asked the move generator, for a checker sitting directly behind a wall, how many of the 36 rolls let it move at all:
| Wall in front of the checker | Rolls that free it | Win rate when built |
|---|---|---|
| Four points | 20 of 36 | 68.7% |
| Five points | 11 of 36 | 68.2% |
| Six points | 0 of 36 | 74.1% |
A five-prime already leaves only the sixes — eleven rolls in thirty-six, and any of them may still be blocked further on. The sixth point takes that to zero: no number on two dice is larger than six, so a full prime is not "hard to escape", it is arithmetically impossible to escape until you break it yourself.
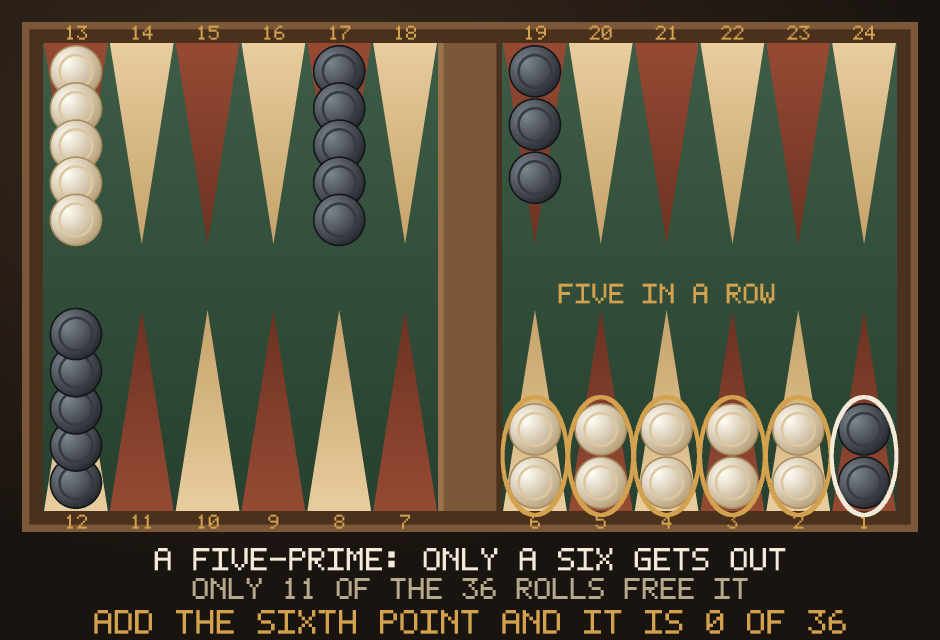
You rarely start with a full prime; you build toward it. Aim to make consecutive points in front of the checker you want to trap, and hold the structure with your spares. Two ideas make priming work:
- Trap first, then roll the prime home. Once a checker is behind a 4- or 5-prime, keep the wall intact and walk it forward point by point toward your home board, dragging the trapped checker's owner into a hopeless spot.
- Timing matters. A prime is only useful while you can hold it. If your other checkers are forced to move and crash the wall before you've cashed in, the trap springs open. This is the reason a big early lead in the race can actually hurt a priming game: you run out of safe moves and have to dismantle the wall while the trapped checker is still behind it.
Anchors: your safety net
An anchor is a made point in your opponent's home board. It is the trailer's best friend: your back checkers can never be hit while they sit on it, and it gives you a base to hit them from as they try to bear in.
- The 20-point (golden anchor) is the best — advanced enough to threaten and escape, deep enough to be safe.
- Deeper anchors (the 1- and 2-points) are safer but more passive — good for a back game, weak for winning outright.
- Don't break an anchor too early. It's your insurance against losing the race. Give it up only when you're clearly ahead and ready to run.
The blitz: attack and close out
A blitz is an all-out attack. You hit a checker, then keep making home-board points and hitting again, so your opponent stacks up on the bar and can't get back in. If you make all six home-board points while they have a checker on the bar, you've closed them out — they can't move at all until you break your board, and you often pick up a gammon.
Blitz when:
- Your opponent leaves an early blot in or near your home board.
- You already have two or three home-board points made (a threatening board).
- You have spare builders ready to make more points quickly.
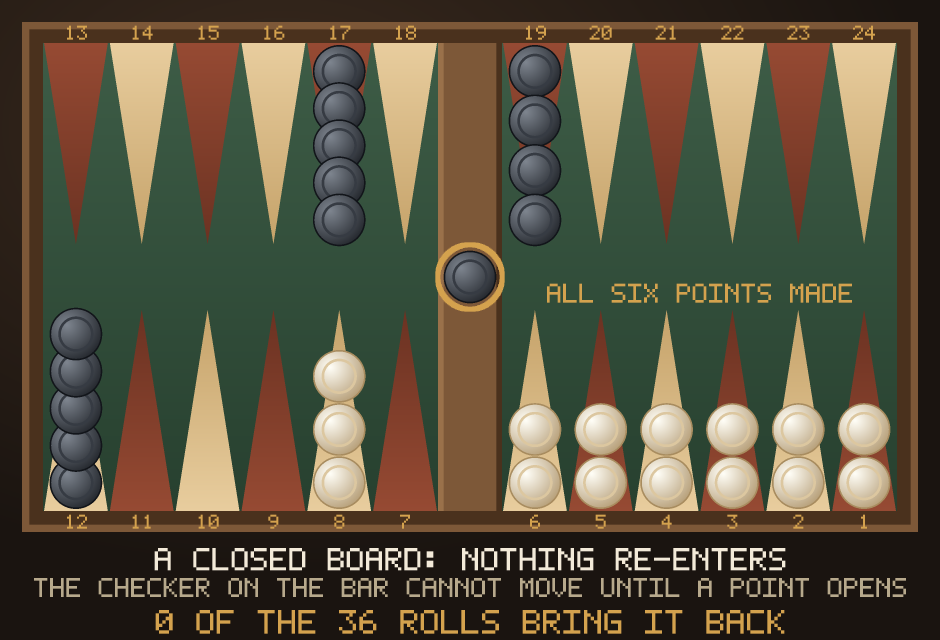
The risk: if the attack stalls and you've scattered blots, you can get hit back hard. Commit to the blitz when the board supports it — half-measures are the worst of both worlds.
Notice what a closed board really does: the trapped player forfeits every roll, not just their entry. While you calmly bring your remaining checkers round and start bearing off, they sit out the game entirely. That is why a successful blitz so often produces a gammon — a double game — rather than a plain win. It is also why the attack is worth some risk: the pay-off is not one point but two.
Back games (handle with care)
A back game is the last resort when you're badly behind: you hold two anchors deep in your opponent's home board and wait to hit a shot as they bear in. The best anchor pairs are close together (for example the 1- and 3-points, or the 2- and 4-points).
Be honest, though: back games are hard to play well and often lose gammons when they fail. For most players, a holding game with a single strong anchor (the 20- or 18-point) is a more reliable way to play from behind. Reach for a full back game only when nothing else gives you a chance.
Dice economy: duplication & diversification
Strong players squeeze more out of the dice with two related ideas:
- Duplication. Arrange your position so your opponent needs the same number to do two different good things. If a 4 is the only number that lets them both hit you and make a key point, you've cut their good rolls — one 4 can't do both.
- Diversification. Do the opposite for yourself: place your builders so that many different numbers let you make a point next turn. More working numbers means more good rolls.
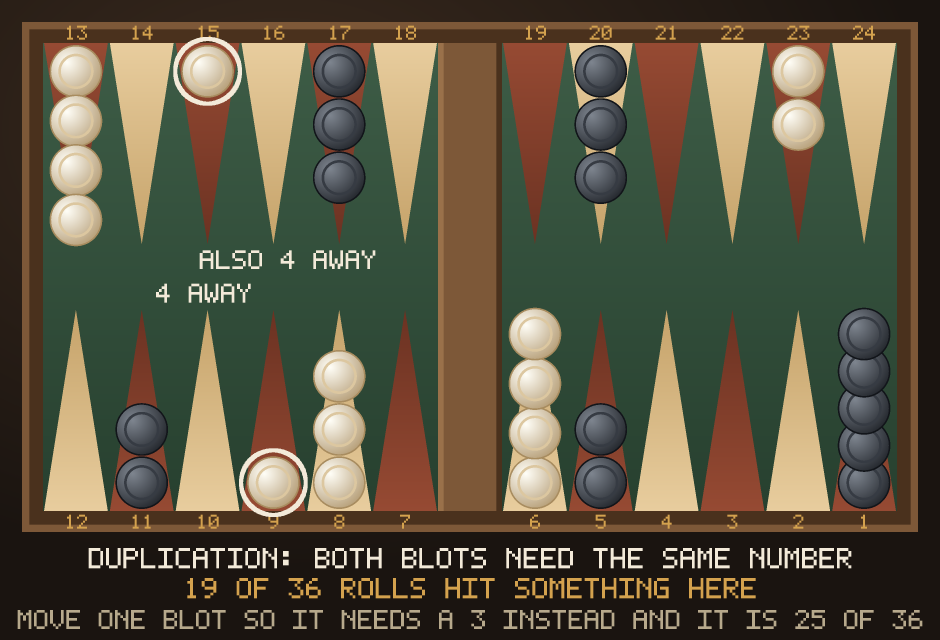
That is duplication in one picture, and the numbers are not a feeling: with both blots four pips away, 19 of the 36 rolls hit at least one of them. Shift a blot so that it needs a three instead and the same two blots are hit by 25 of 36. Same number of blots, same distances from home — six extra losing rolls, purely because the threats no longer share a number.
You don't need to calculate this precisely at the board. Just ask, before a quiet move: "Which numbers help me next roll, and which numbers help my opponent?" — then nudge the odds your way. The full shot table, for every distance from 1 to 24, is on the odds page.
Bearing off safely
In a pure race the bear-off is mostly automatic, but two things cost beginners whole games:
- Don't leave a shot while your opponent still holds an anchor in your home board. Clear your points from the back, keep them even, and avoid leaving a single checker exposed — one late hit can send it all the way around and lose the game you had won.
- Avoid gaps. Fill in your home board evenly so you're not forced to waste pips or leave a blot later. Cross a checker over to fill an empty point rather than stacking one high.
If there's no contact left — both sides are just racing off — play the most efficient move (fill gaps, avoid wastage) and don't overthink it.
Common strategic mistakes
- Playing without a plan. Drifting move-to-move. Decide race / prime / blitz / hold, and let it steer every roll.
- Racing when behind (or holding when ahead). The pip count tells you which; most blunders ignore it.
- Breaking an anchor too early and losing your safety net.
- Half-committing to an attack, leaving loose blots without the board to back it.
- Over-stacking the 6-point instead of spreading builders to make new points.
- Leaving needless shots in the bear-off against an anchor.
A quick decision framework
Before you move, run through this in a few seconds:
- 1. Check the race. Ahead, even, or behind? (Glance at the pip count.)
- 2. Pick the plan. Ahead → race. Even → make points, take good hits. Behind → hold an anchor, play for a shot or a prime.
- 3. Find the strongest play for that plan. Can you make the 5-point or bar point? Point on your opponent's head? Double hit? A safe, efficient move?
- 4. Weigh the shots. If you must leave a blot, count how many numbers hit it — and whether the reward is worth it.
Do that consistently and you'll beat most casual players — the dice will still swing individual games, but strategy wins the long run.
Questions people ask
- What is the best strategy in backgammon?
- There is no single best strategy — there are four, and the skill is picking the right one. Race when you are ahead in the pip count, prime when you have trapped a checker, blitz when your opponent leaves a blot and your home board is strong, and hold an anchor when you are behind. Committing to the wrong plan loses more games than playing any plan slightly imperfectly.
- What is the most important point in backgammon?
- Your 5-point, called the golden point. It is part of your home board, part of any prime you build, and the point an escaping back checker most wants. In our 3,000-game measurement the side that made its own 5-point first won 58.4% of games.
- Is a prime better than hitting?
- In our measurement, a six-prime was worth more than winning the hitting battle: 74.1% against 71.9%. They are not alternatives, though — hitting is usually how you win the time to build the prime in the first place.
- How long does a prime need to be?
- Six points is the only length that is airtight. Behind a five-prime, 11 of the 36 rolls still escape, because a six can jump it; behind a four-prime, 20 of 36. The sixth point is the one that takes the escape chance to zero, since no single die is bigger than six.
- Should I always hit my opponent's blot?
- No. Hit when it gains the race, when it makes a key point at the same time, or when your home board is strong enough that re-entry hurts. Think twice when your own board is weak, when you are comfortably ahead in the race, or when hitting leaves you with a worse blot than the one you removed.
- What is the 20-point anchor and is it worth it?
- It is two checkers on your opponent's 5-point — the safest place to keep back checkers. In our games the side that got there first won 52%, essentially even. That is not a failure: you take the anchor when you are behind, so holding a losing position to even is exactly what it is meant to do.
- Why do anchors show a losing win rate in your data?
- Because it is a selection effect, not a verdict on anchors. You are still holding a back anchor precisely because you are behind — the side that is ahead ran those checkers home long ago. So the games in which one side is left with the only anchor are games that were already going badly for that side. The number describes the positions, not the play.
- When should I play a back game?
- Rarely, and only when you are already far behind and have two anchors deep in the opponent's home board. Back games need timing you usually do not have: while you wait for a shot, your other checkers must still have safe moves to make. Most back games are entered by accident and lost by a gammon.
- What is duplication in backgammon?
- Arranging your position so that one number does two jobs for your opponent, cutting the rolls that help them. With two blots both four pips away, 19 of the 36 rolls hit something; move one blot so it needs a three instead and 25 of 36 do. Same exposure, six extra bad rolls.
- How do I stop stacking checkers?
- Watch the 6-point. Three or four spare checkers there are not assets — they are one made point plus checkers that cannot reach anything. Keep spares on the 8- and 13-points, where they can make new points, and spend them on the 5-point, the bar point and the 4-point.
- How much does strategy matter against the dice?
- Over one game, not much; over a match, a great deal. We measured this separately: a player who wins 55% of single games wins about 70% of 25-point matches. The full curve is on our luck-or-skill page.
- What is the fastest way to improve at backgammon?
- Learn to count pips so you always know which plan you are in, prioritise the 5-point and the bar point, and stop making moves that leave blots for no gain. Those three habits beat memorising positions, and all of them can be practised against the computer here for free.
Put it into practice
Reading strategy only gets you so far — you learn it by playing. On BackgammonWorld you can practice against the computer on three levels (the hard engine will punish loose blots and reward a good prime), or play friends and online opponents, all free with no signup.
▶ Play backgammon nowSee also: How to Play Backgammon (rules, setup, bearing off), the best opening moves with diagrams, and the doubling cube guide — in a match, the cube decides more games than the checkers do. And if better play never seems to pay off, is backgammon luck or skill? measures how long it takes before it does.
← Back to the game