How to Play Backgammon
A complete guide for beginners and improving players
Last updated
Backgammon is one of the oldest board games in the world — a fast, tactical race for two players that mixes luck and skill in a way few games match. This guide teaches you to play it: how a turn works, hitting and the bar, bearing off, reading the race, and the handful of ideas that separate a beginner from someone who wins. Three companion pages go deeper where you need it — setting up the board, the complete rules as a reference, and strategy. When you are ready, play a free game right here on BackgammonWorld and put it into practice.
The fastest way to learn is to play a hand while you read. Open the board in a second tab and try each idea as it comes up — a turn takes seconds against the computer, nothing is recorded, and no account is needed.
▶ Open the board in a new tabBackgammon instructions: the whole game in ten steps
If you have a board in front of you and someone waiting to play, this is the short version. Every step has a section below that explains it properly.
- Set up. Fifteen checkers each, in four stacks: two on the 24-point, five on the 13-point, three on the 8-point, five on the 6-point. Both players' home boards must be on the same side of the table.
- Decide who starts. Each player rolls one die; the higher number goes first and plays both dice. Equal numbers, roll again.
- Move towards your own home board, always. The two of you travel in opposite directions.
- Play both dice as two separate moves. One checker by each number, or one checker twice. Doubles give you four moves of that number, not two.
- You may land anywhere that is open — empty, yours, or holding exactly one enemy checker. A point with two or more enemy checkers is closed to you.
- Landing on a lone enemy checker hits it. It goes on the bar and has to start its journey again.
- A checker on the bar comes back first. Nothing else of yours may move until it has re-entered in the opponent's home board.
- Use as much of the roll as you legally can. If only one number can be played, play it; if either would work alone but not both, play the higher one.
- Bear off once all fifteen are home. An exact number takes a checker off that point; a number higher than your highest occupied point takes one off from there.
- First to take all fifteen off wins — one point normally, two if the loser has borne off none (a gammon), three if they also still sit on the bar or in your home board (a backgammon).
The goal of the game
Each player has fifteen checkers. The two players move their checkers in opposite directions around the board, both heading toward their own home board (the quarter of the board nearest them). Once all fifteen of your checkers are in your home board, you start taking them off the board — this is called bearing off. The first player to bear off all fifteen checkers wins the game.
Along the way you are not just racing: you can land on a lone enemy checker to send it all the way back to the start, and you can block your opponent's path. So backgammon is a race and a fight at the same time — and knowing when to do which is the whole art of the game.
The board and starting position
The board has 24 narrow triangles called points, grouped into four quadrants of six. Each player has a home board and an outer board. On BackgammonWorld the points are numbered 1 to 24 from your point of view: your home board is points 1–6 (bottom right), and your checkers travel around toward point 1, where they bear off. Your opponent sees the board the same way from their side, so their numbering is the mirror of yours.
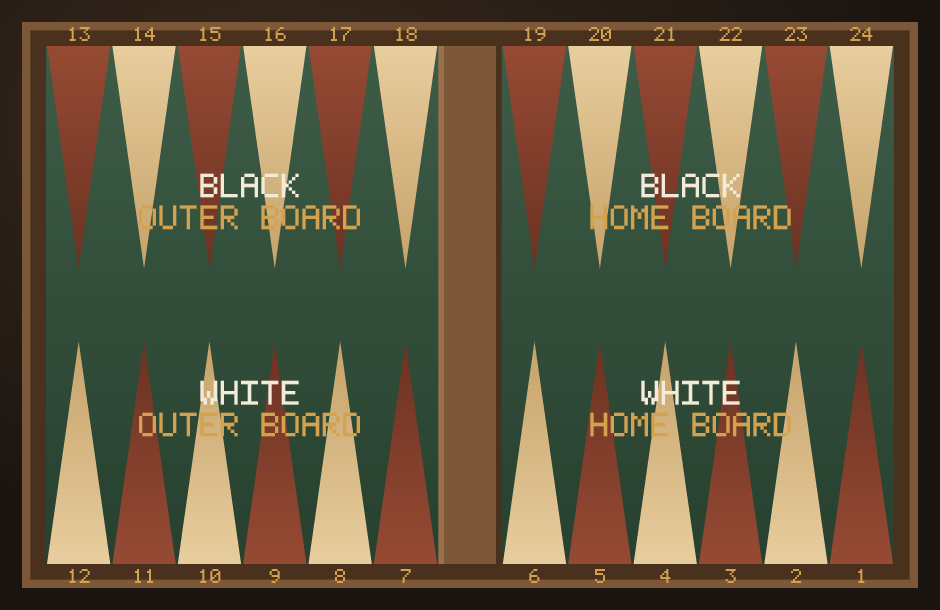
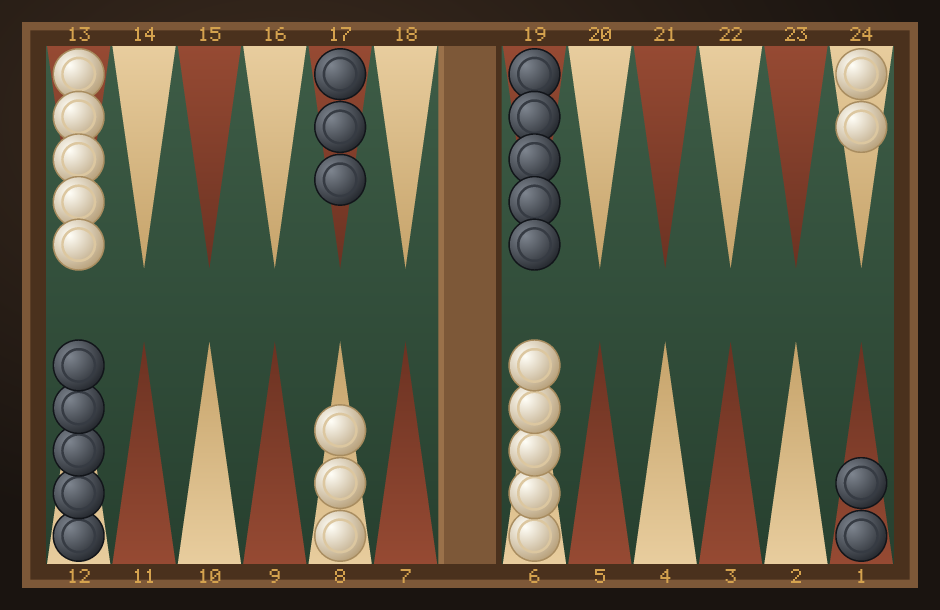
Each player starts with fifteen checkers in four stacks — two on the 24-point, five on the 13-point, three on the 8-point, five on the 6-point — and the two sides are mirror images of each other. Between the two halves runs the bar, where checkers that get hit are placed; off to the side is the tray where borne-off checkers go.
Setting up a physical board for the first time, or want to know why the position looks like that? That is a subject of its own, and it has its own page: our backgammon setup guide covers the stacks one by one, which way each player moves, how to check you got it right in five seconds, and the mistake that ruins most first games — the two home boards ending up on opposite sides.
Taking your turn
To decide who starts, each player rolls a single die; the higher number goes first and plays those two dice as the opening move. After that, players alternate, rolling two dice each turn.
The two numbers on the dice tell you how far you may move, and the rules are simple:
- Each die is a separate move of one checker. A roll of 5-3 lets you move one checker five points and another three points — or the same checker five then three (as long as the in-between point is legal to land on).
- You may only land on a point that is open — empty, holding your own checkers, or holding exactly one enemy checker (which you then hit; see below). A point held by two or more enemy checkers is blocked.
- Roll doubles (two of the same number) and you play that number four times instead of twice. Double 4s means four moves of four.
- You must use as much of your roll as possible. If you can play both dice, you must. If only one die can be played but either one would be legal on its own, you must play the higher number. If nothing can be played, your turn is simply forfeited.
Your first turn, move by move
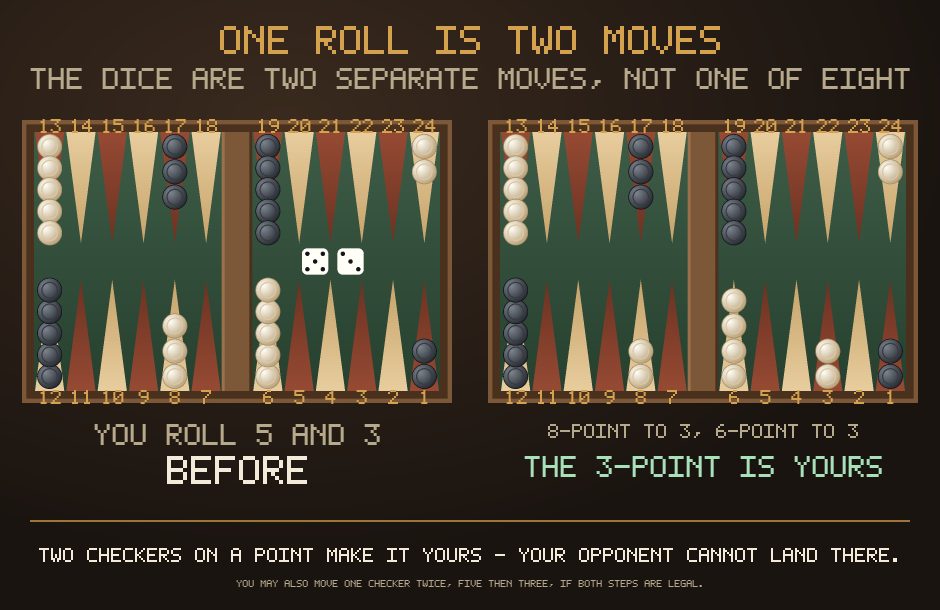
The rule that trips up almost everyone: the two dice are two separate moves, not one move of their total. Roll 5 and 3 and you may move one checker five points and another three — or the same checker five and then three, provided both halves land somewhere legal on their own.
Step by step
- Roll both dice. They land in your half of the board. Doubles are worth four moves of that number, not two.
- Decide what each die does. Each one moves a checker that many points towards your home board. A point held by two or more enemy checkers is closed to you.
- Play both if you can. You are obliged to use both dice if any legal sequence lets you. If only one number can be played, you must play the higher one.
- Confirm. On this site you drag or tap the checkers and then press Confirm, which is your chance to change your mind — nothing is sent to your opponent until you do.
Which move is right?
With 5 and 3 the standard play is to make your 3-point, exactly as in the picture: two checkers on a point make it yours, and a point your opponent cannot land on is worth more than a few pips of progress. The full list of best replies to all fifteen opening rolls is on the opening moves page.
A complete game, move by move
Rules tell you what is legal. They do not tell you what a game feels like — how long the quiet stretches are, how fast a winning position can turn over, or how often the player who does everything right still loses. So here is one whole game, from the opening roll to the last checker, in six pictures.
This is a real game, not an illustration. It was played by the same engine
and the same computer opponent that run the board on this site, at its strongest setting, and
the diagrams are photographs of the position at each moment. Nothing was arranged, and every
position is legal by construction. The script that produced it is
assets/make-firstgame-images.js in our repository; it plays games until one
contains all six lessons a first game has to show, and it is seeded, so it produces this
same game every time.
One thing to know before you start reading the boards: the numbers around the edge are White's numbering. Every point has two names, one for each player, because each of you is heading the other way — the point marked 20 is White's 20-point and Black's 5-point. It is the single most confusing thing about backgammon notation, and seeing it happen is easier than being told.
Turn 1 — White opens with 4-1
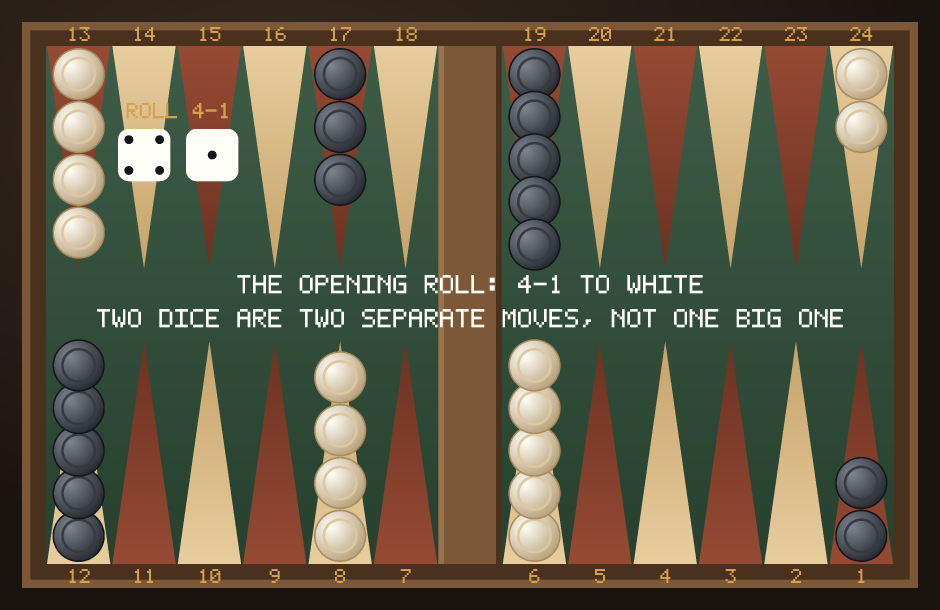
Each player rolls one die to see who starts, and the winner plays both numbers as their first move. That is why the opening roll can never be a double. White has 4 and 1 and, like every roll in the game, must decide whether to move two checkers or run one checker twice.
Turn 4 — Black makes the most valuable point on the board
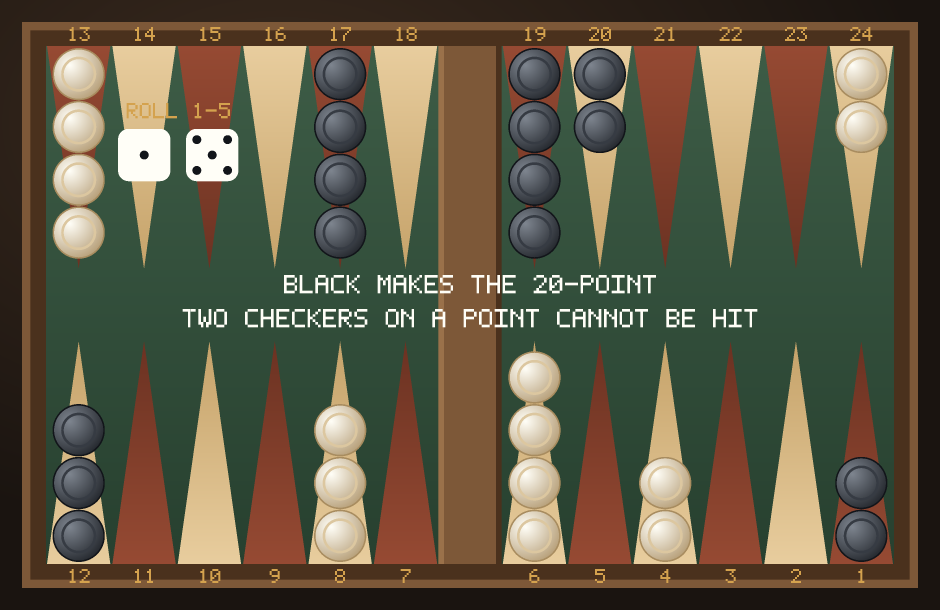
Two checkers on a point make it. Nobody can land there, so those checkers cannot be hit, and the point itself blocks one number for the other side for as long as it is held. Your own 5-point is the best one to own: it sits right where the opponent's back checkers have to pass, and it is the first brick of a wall. If you learn one habit in your first ten games, make it this one.
Turn 10 — the wall goes up
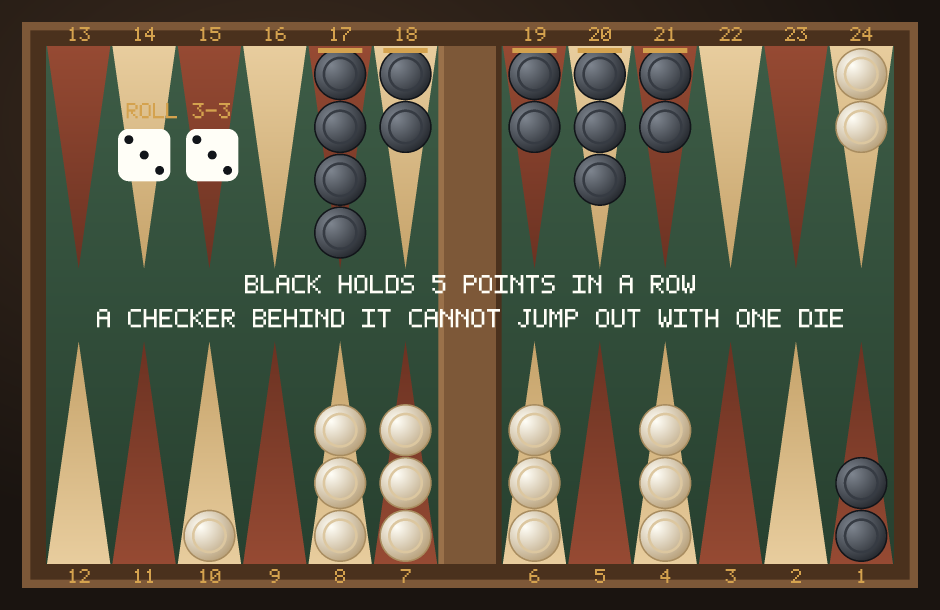
This is what making points adds up to. A single die can move a checker one to six pips; five points in a row means no single die gets a checker through, and a six-point prime — the full wall — cannot be jumped at all, by any roll, ever. White's back checkers are not captured, they are simply stuck, and they will stay stuck until Black has to break the wall to bring checkers home.
Notice what has not happened yet: nobody has been hit. Ten turns in, this game is still a building race. That is normal, and it is the part rulebooks skip.
Turn 24 — the first hit
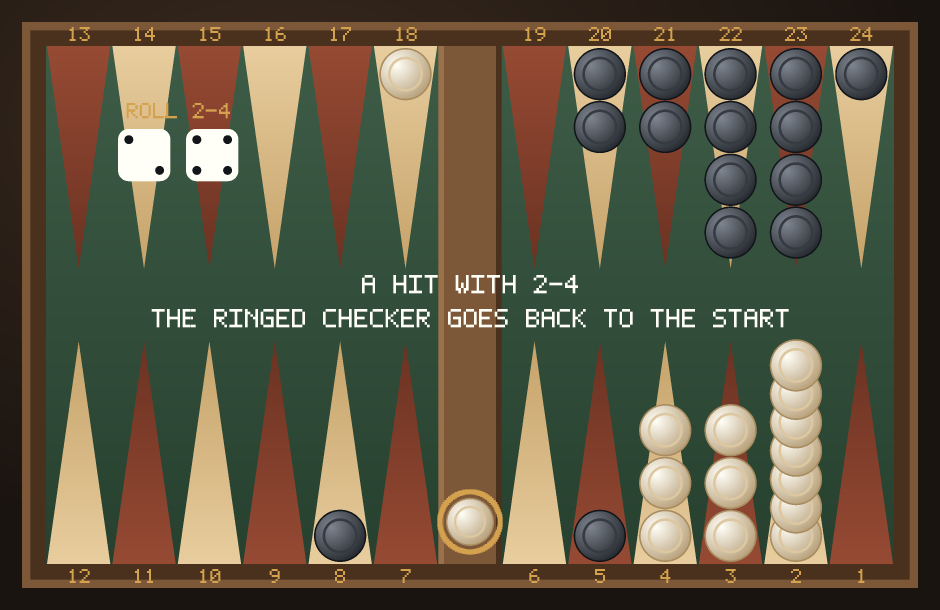
A point with exactly one checker on it is a blot, and any opponent who can reach it may hit it. The checker is not captured: it goes on the bar and has to re-enter in the opponent's home board and travel the whole way round again. Nothing else of yours may move until it is back. That is the entire cost of a hit, and it is why a well-timed one can decide a game.
Turn 25 — White comes back, and hits on the way in
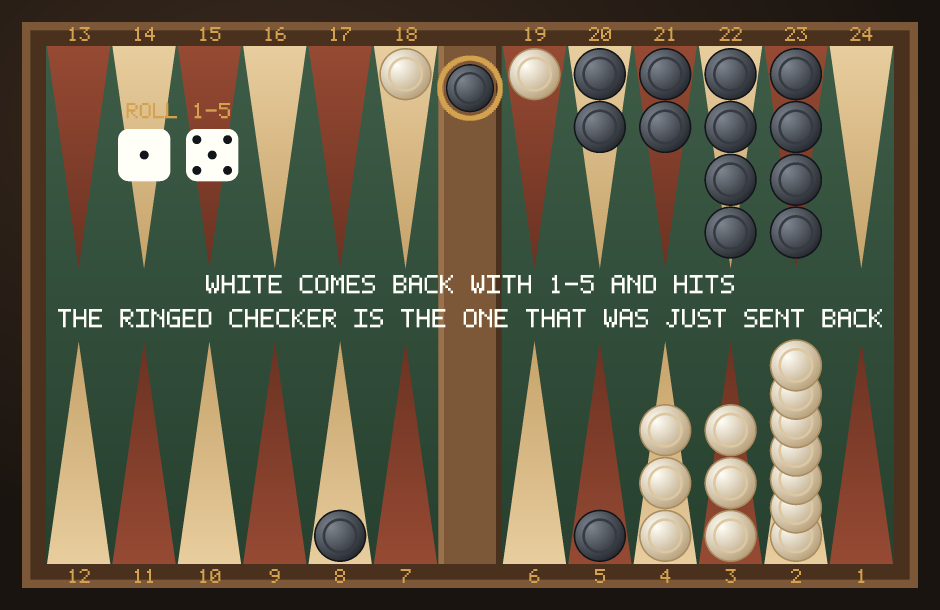
This is the swing the whole game turns on, and it took one roll. A checker entering from the bar plays by the ordinary rules once it lands, so it can hit like any other. Black had the better position for twenty turns; from here White is the one making progress while Black walks a checker back around the board.
Turn 31 — bearing off
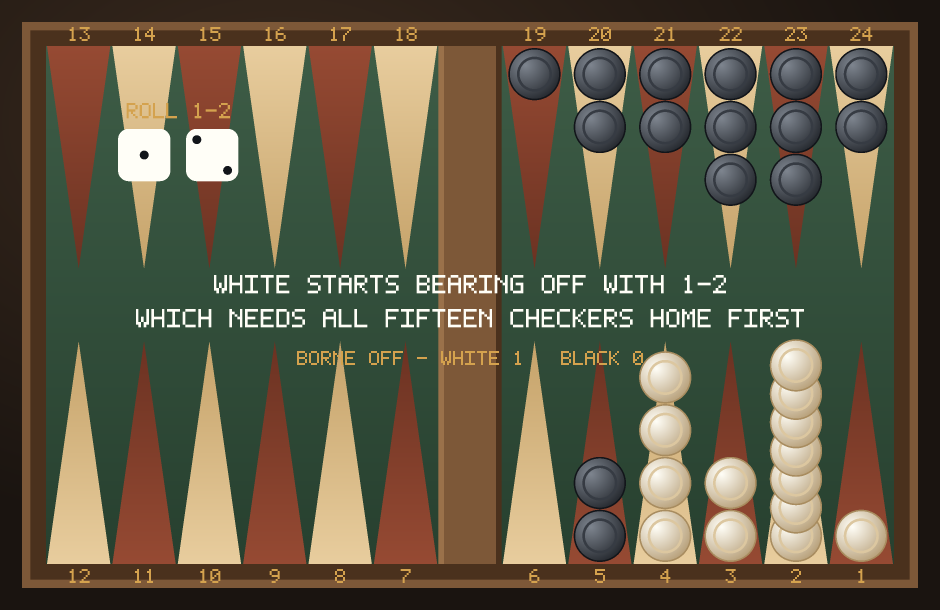
Bearing off needs every one of your fifteen checkers inside your home board — the last six points before the edge. A roll of 4 takes a checker off your 4-point; a number higher than your highest occupied point takes one off that highest point instead.
And this position contains the trap worth knowing before you meet it: Black still holds an anchor inside White's home board. Every checker White takes off thins out the remaining points, and a careless order can leave a single checker exposed to those two Black checkers — one hit at this stage sends it the whole way round and turns a won game into a lost one. Take them off evenly, and do not leave a blot to save one pip.
Turn 43 — White wins
White bears off all fifteen on turn 43. Black had borne off five by then, so it is an ordinary single game, worth one point — not a gammon, which would need Black to have taken off none at all.
Here is the part worth keeping. Black made the best point on the board on turn 4, built a five-point wall by turn 10, and landed the first hit on turn 24. Black played the better game for twenty-four turns — and lost, because of one roll that both entered from the bar and hit. That is backgammon: the better player wins far more often than not over a match, and any single game can go the other way. If you lose one like this, you did not necessarily do anything wrong. Play the next one.
Hitting, blots and the bar
A point with only one of your checkers on it is called a blot. A blot is exposed: if an opponent can land on it, they hit it, and your checker is picked up and placed on the bar — the wooden ridge down the middle of the board.
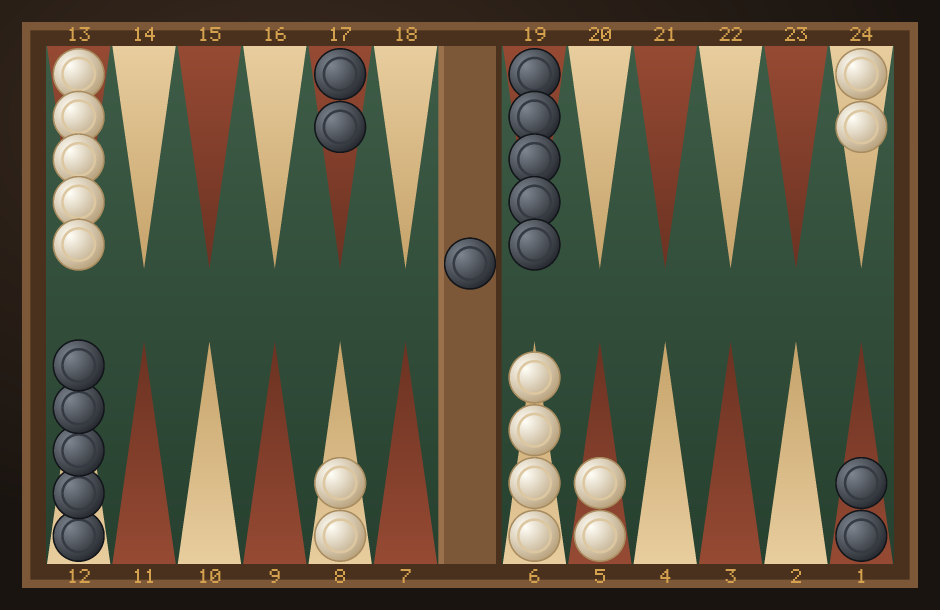
A checker on the bar must re-enter the board in the opponent's home board before you may make any other move. You enter using a die value: a 3 enters on the point 3 deep into that home board, and so on. If both entry points are blocked, you cannot move at all that turn — this is called dancing (or being "stuck on the bar"), and it can be very costly. With four of the six entry points closed against you, only 20 of the 36 rolls bring you back in — the full set of figures is on the backgammon odds page.
Getting hit sends a checker all the way back to the start of its journey, so a single hit can swing the race by a huge number of pips. Deciding when to leave a blot, when to hit, and when to play safe is the heartbeat of backgammon.
Making points, anchors and primes
When you have two or more checkers on a point, you have made that point: your opponent cannot land there, and your own checkers there are safe from being hit. Making points is how you build both safety and blockades.
- A made point in your own home board (1–6) is a wall against a checker your opponent is trying to bring in from the bar. Make several and your home board becomes hard — or impossible — to enter.
- A made point deep in the opponent's home board is called an anchor. An anchor is a safe base for your back checkers and a launch pad for a hit later. The most valuable anchors are the 20-point ("golden anchor") and the 18-point (bar point anchor).
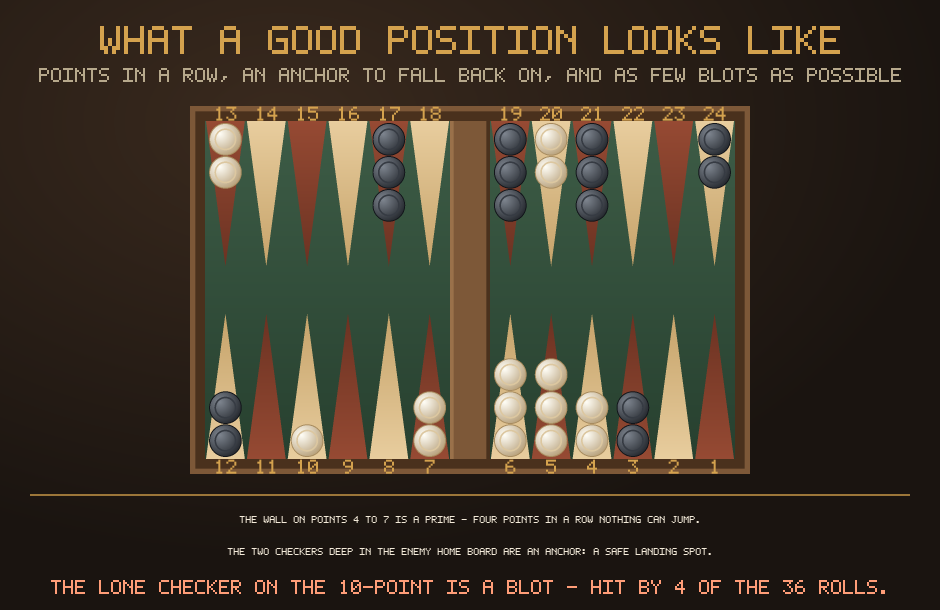
- Several made points in a row form a prime. A full six-point prime is an unbreakable wall — a checker trapped behind it cannot escape with any roll until you open a gap.
Why a prime is worth more than a hit
A hit sends one checker back to the start; a prime stops it getting home at all. Four points in a row cannot be jumped by any single die, and six in a row cannot be jumped at all. Beginners chase hits because they are satisfying; games are won by the player who quietly builds a wall while the other one chases.
Why an anchor is not a retreat
Two checkers on a point in your opponent's home board look like they are stuck. They are insurance: while you hold that point you can never be shut out, you always have somewhere safe to land, and you keep a shot at anything that walks past. Give up your last anchor too early and a single hit can cost you the game.
Taking your checkers off the board
Once all fifteen of your checkers are in your home board (points 1–6), you may begin bearing off. You cannot bear off while a checker is still outside the home board or sitting on the bar — bring it home first.
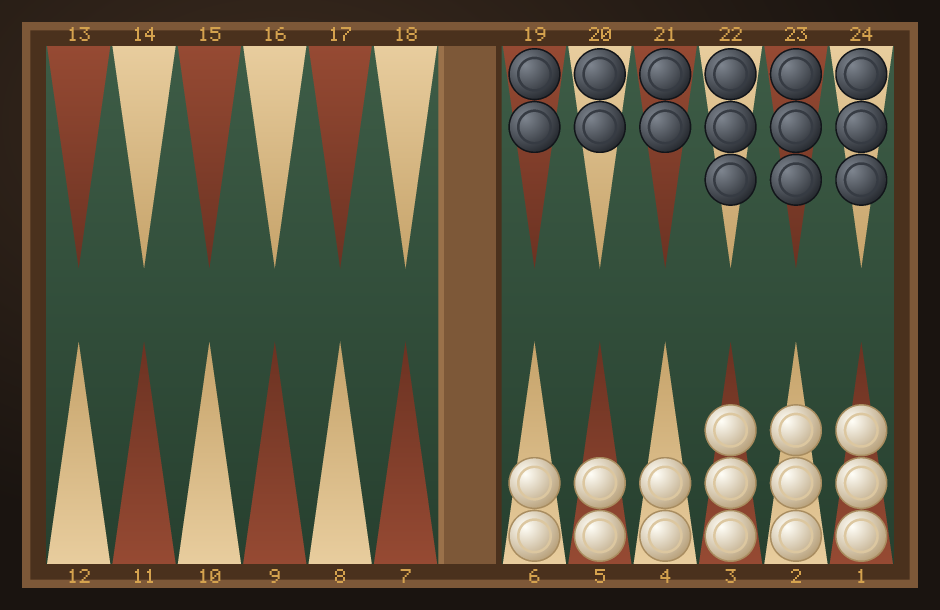
The dice tell you which checkers you can take off:
- A roll takes a checker off the point of the same number: a 4 bears a checker off your 4-point.
- If you roll a number higher than your highest occupied point, you may bear a checker off from that highest point. (For example, if your highest checkers are on the 4-point and you roll a 6, a checker comes off the 4-point.)
- You may always choose to move a checker inside the home board instead of bearing off, which is sometimes safer.
One trap to watch: if your opponent still holds an anchor in your home board, bearing off carelessly can leave a blot that gets hit — sending a checker all the way around again just as you were about to win. Bear off smoothly, keep your points even, and try not to leave a shot.
What your win is worth
This page teaches you to play; the rules page is the reference. Where you want the exact wording of a rule — what happens with a closed board, how the doubling cube works in a match, which house rules exist — look it up there. Here we stay with what a beginner needs to get through a first game.
The first player to bear off all fifteen checkers wins — but not every win is worth the same:
- Single game (1 point): you win and your opponent has already borne off at least one checker.
- Gammon (2 points): you bear off all fifteen before your opponent bears off a single checker. A gammon counts double.
- Backgammon (3 points): a gammon and your opponent still has a checker on the bar or in your home board. A backgammon counts triple — the biggest possible win.
This is why, when you are far ahead, it is often worth playing on aggressively for a gammon rather than settling for a plain win — and why, when you are far behind, keeping just one checker alive can save you two points. On BackgammonWorld you can play quick single games or a match to 3 or 5 points with the doubling cube — gammons and backgammons multiply the cube's value, and the final screen shows exactly what your win was worth. If the cube is new to you, the doubling cube guide explains when to offer it and when to refuse.
Pip counting
Your pip count is the total number of pips (points) all your checkers still have to travel to bear off. It is the single most useful number in backgammon: it tells you, at a glance, whether you are ahead or behind in the race — and therefore whether you should be racing home or fighting.
To count it, multiply the number of checkers on each point by that point's number and add it up. Both players start on 167, exactly even. Every move you make drops your count by the pips you played; every hit you take adds back the pips that checker loses, which is why a hit near the end hurts so much more than a hit at the start.
As a rough guide, if you are ahead by about 8–10% or more you are usually favoured in a straight race, so simplify and run for home. If you are behind, hold an anchor and play for a hit. That single comparison decides more games than any other piece of thinking a beginner can do.
The best opening moves
The opening roll is always two different numbers (a tie on the opening die is re-rolled), so there are fifteen possible opening rolls. Decades of computer analysis have produced well-established best plays for each. Below, notation like 8/5 means "move a checker from your 8-point to your 5-point". A few rolls have more than one strong choice, shown as an alternative.
You do not need to learn all fifteen by heart to play well. Every strong opening does one of three things — and knowing which is enough to find a reasonable move on your own:
- Make a valuable point. 3-1 makes the 5-point (the best opening roll there is), 6-1 the bar point, 4-2 the 4-point, 5-3 the 3-point. Take these whenever the dice offer them.
- Bring a builder down from the midpoint, so you can make a new point next turn.
- Advance a back checker toward safety — 6-5 runs one all the way with the "lover's leap" (24/13), and several rolls split the back checkers toward an anchor.
The best play for every one of the fifteen opening rolls, with a diagram of each, is in our backgammon opening moves guide.
Core strategy for beginners
You do not need to memorise everything to start winning. A handful of principles will take you a long way:
- Prioritise the 5-point and bar point. These points do the most to block your opponent's back checkers. Make them early whenever you can.
- Bring builders down. Spare checkers on your 8- and 13-points are ammunition — they let you make new points next turn. Do not leave everything stacked on the 6-point.
- Keep an anchor when you are behind. If you have lost the race, hold a point in your opponent's home board. It keeps your back checkers safe and gives you a shot at a game-saving hit later. Don't run an anchor too early.
- Pick a game plan and commit. Broadly there are four: race (run for home when you are ahead), prime/block (wall your opponent's checkers in), blitz (attack and try to close your home board while they are on the bar), and hold/back game (sit on an anchor and wait for a shot when you are behind). Let the pip count and the position tell you which.
- Count the shots before you leave a blot. Numbers 1 through 6 are "direct" shots; combinations like 6-2 to reach a distance of 8 are "indirect". Leaving a blot is fine when the reward is high or the shot is unlikely — just do it on purpose, not by accident.
- Play for the gammon when you are winning big, and to save the gammon when you are losing big. Because gammons count double, they often matter more than the plain win.
Ready to go deeper? Our dedicated backgammon strategy guide covers the four game plans, building a prime, anchors, the blitz, dice economy, and clean bear-offs.
Common beginner mistakes
- Playing too safe. Never hitting or never leaving a blot lets a good opponent outmanoeuvre you. Backgammon rewards controlled aggression.
- Over-stacking. Piling checkers on the 6-point and midpoint feels safe but wastes their point-making potential. Spread out into builders.
- Breaking an anchor too early. Your back anchor is your insurance. Don't give it up until you are clearly ahead in the race.
- Ignoring the race. Priming and holding when you are actually ahead just gives the lead back. If the pip count says run, run.
- Leaving needless shots in the bear-off. When an opponent still has an anchor, bear off in a way that keeps your points even and avoids exposing a blot.
Is backgammon hard to learn?
No — and the honest version of that answer is more useful than the cheerful one. The rules take about ten minutes; the ten steps at the top of this page really are all of them. You can play a complete game against the computer here before you have finished reading this sentence's paragraph, and you will not break anything, because the board only ever offers you legal moves.
What takes longer is judgement: whether to hit or run, when a blot is worth leaving, whether the position in front of you is a race or a fight. That part has no ceiling — people play for forty years and still improve — but you do not need any of it to start, and you will pick up the first useful chunk in your first ten games simply by noticing what hurt.
Two things make it easier than chess to get going with, and both are worth knowing before you start. The dice mean a beginner beats a strong player often enough to stay interested: in our own measurements, a clearly better player still loses 45% of individual games, and even a much better one loses 38%. Skill shows up over a match, not over an evening. And there is no opening theory to memorise: fifteen opening rolls, each with one sensible answer, and you can look them up as they come.
A one-page cheat sheet to print
Screens are awkward next to a real board. This is everything on the page above compressed onto a single sheet: the starting position, how a turn works, hitting and re-entry, bearing off, and what a win is worth — the things people actually ask about mid-game.
⤓ Download the one-page rules (PDF)
It is free, there is nothing to sign up for, and you may print it for a club, a class or a family Christmas without asking us. If you would rather have the full reference than a single page, the complete rules cover the edge cases this sheet leaves out.
Questions beginners ask
How do you play backgammon, step by step?
Set the board up with fifteen checkers each in four stacks; roll one die each to see who starts; then take turns rolling two dice and moving checkers towards your own home board, treating the two numbers as two separate moves. Land on a lone enemy checker to send it to the bar, and bring your own back from the bar before you move anything else. When all fifteen of your checkers are home, start taking them off. First player to take all fifteen off wins. The ten-step version at the top of this page is the same thing with the exceptions filled in.
Is there a simple version of the rules for a complete beginner?
Yes, and you are not missing anything by using it — backgammon's whole rulebook fits on one page. The ten steps above are the entire game; the printable sheet is the same thing for the table. Everything else written about backgammon is judgement, not rules, and none of it is needed to play a legal game today.
How do you play backgammon on a board, rather than online?
Identically — the rules are the same, and this site's board is a picture of a real one. Three things you do yourself on wood that the screen does for you here: you check the setup (both home boards on the same side, and our setup guide shows the five-second check), you work out your own legal moves, and you count your own pips. A turn is finished when you pick your dice up, so think before you do.
How long does it take to learn backgammon?
About ten minutes to learn the rules and one game to see them happen. Playing well is a different question, and the honest answer is that it has no end point — but you are a real opponent for another beginner after an evening, and the dice mean you will beat better players often enough to enjoy it long before you deserve to. See is backgammon hard to learn for the longer version.
How many checkers does each player have in backgammon?
Fifteen each. They start on four points: two on the 24-point, five on the 13-point, three on the 8-point and five on the 6-point — mirrored for the two players. The board setup page shows the arrangement point by point.
Which direction do the checkers move?
Each player moves from their own 24-point towards their own 1-point, so the two of you travel in opposite directions around the board. Your home board is the quarter you are heading for, and everything you count is counted towards it.
What happens if I cannot move?
You lose the turn. It is the only case in backgammon where you do nothing: if neither die can be played legally, play passes. If only one of the two can be played, you must play it — and if either could be played alone but not both, you must play the higher one.
Can I move backwards?
No. Checkers only ever move towards your home board. The one thing that sends a checker backwards is being hit: it goes to the bar and re-enters at the far end.
What is a blot?
A point with exactly one of your checkers on it. Your opponent may land there, which sends your checker to the bar and back to the start of its journey. Two or more checkers on a point cannot be hit at all — which is why "making points" is the whole game.
What do I do when a checker is on the bar?
Nothing else, until it is back. A checker on the bar must re-enter in your opponent's home board on a point matching one of your dice, and no other move is legal while it sits there. If all six of those points are held by two or more enemy checkers you cannot enter at all and lose the turn.
When can I start bearing off?
Once all fifteen of your checkers are in your home board — the last six points before the edge. If one gets hit after you have started, you must bring it all the way round and back home before you may bear off again.
What is the doubling cube for?
It raises the stakes. Before your roll you may offer to double the value of the game; your opponent either takes it — and now owns the cube, so only they may double next — or gives up the current value on the spot. It is where most of the skill in a match lives, and it has a page of its own.
What is a gammon?
Winning while your opponent has not borne off a single checker: it counts double. If they also still have a checker on the bar or in your home board it is a backgammon, worth triple. Both are ordinary results, not rarities — about three games in ten finish that way.
How long does a game take?
A single game runs about 57 rolls between two even players, which is ten to fifteen minutes at a comfortable pace. Matches are played to a number of points rather than a number of games, so a match to five can be one bad-tempered game or six quick ones.
Is backgammon luck or skill?
Both, and that is the point. Any single game can be lost to the dice; over a match the better player wins far more often than not, because every roll is a decision about risk. The dice decide what you are offered — you decide what to do with it.
Do I need an account to play here?
No. Every mode is playable without one: against the computer, against a friend through a private link, or against whoever is in the lobby. An account is free and keeps your rating across devices, which is the only thing it adds.
Glossary of terms
- Point: one of the 24 triangles. Also the act of "making a point" with two or more checkers.
- Blot: a point with a single checker — it can be hit.
- Hit: to land on an opponent's blot, sending it to the bar.
- Bar: the centre divider where hit checkers wait to re-enter.
- Anchor: a made point in the opponent's home board.
- Prime: a row of made points that blocks the opponent's escape.
- Builder: a spare checker positioned to help make a new point.
- Slot: to deliberately drop a single checker on a key point, hoping to cover it next turn.
- Pip count: the total distance all your checkers must still travel.
- Bear off: to remove checkers from the board once all are home.
- Gammon / Backgammon: a double win / a triple win (see above).
- Dancing: failing to re-enter from the bar because both entry points are blocked.
- Golden point: the 5-point — the single most valuable point to make.
- Lover's leap: the 6-5 opening, running a back checker 24/13.
Ready to play?
The fastest way to learn is to play. On BackgammonWorld the board highlights your legal moves, rolls the dice fairly, shows the live pip count, and lets you play the computer on three levels or a friend over a private link — all free, with no signup.
▶ Play backgammon now ← Back to the game